DevOps Build Patterns
This chapter will cover what the author refers to as “DevOps build patterns”. These are effectively common sets of scripts and methods for building software (i.e. artifacts, documentation, etc.), with particular emphasis on how repeatable, reliable, maintainable, and scalable (our four “build pattern viability metrics”), these approaches are. After going over numerous specific cases, we will conclude the chapter with examples for re-creating many of these use cases in a “real world” scenario.
Bare Metal
A “bare metal” build pattern is the most simple to initially configure: one
provisions a physical device (i.e. PC, development board, Raspberry Pi
hobby kit, etc.) with an operating system, and build tool chain (i.e. compilers,
script interpreters, etc.) to produce build artifacts via some manner of
build/compilation process (e.g. compiling .c files with gcc, generating
plots with Python scripts, producing documents from .rst files with
sphinx, etc.).
While initially provisioning such a setup is typically straightforward (e.g. “install Linux to a new laptop for an engineer/developer”), the end result leaves much to be desired in terms of our viability metrics. For example, this approach may be used to provision PCs or laptops for individual developers in one particular manner, and centralized build infrastructure (i.e. “build servers for production-worthy artifacts”) are provisioned in another manner. This often gives rise to the age old statement “but it worked on my machine!”. The software load-out on individual PCs may differ from that on build servers (e.g. due to IT security/company policies), or individual PCs may differ among teams (i.e. depending on what machines were purchased and when, what security updates and system packages have been installed and if they are kept current/up-to-date, etc.).
This approach is reasonable for new teams and projects, but due to the potential for variance in builds (i.e. developer PCs versus centralized build servers, or even variances from one developer PC to another), this approach can burn up a lot of engineering time and effort to maintain long-term. Additionally, without the use of configuration management, it becomes horrible to maintain and completely unscalable. As soon as the opportunity arises, seriously consider migrating to something more modern (such as the examples in the following sections).
Note
Build pattern viability metrics.
Repeatable: yes, but manual and repetetive.
Reliable: yes.
Maintainable: yes, but only via configuration managament or an inordinate amount of time and resources will have to be invested in maintaining such a deployment.
Scalable: no. Requires configuration management to be viable, and variance in hosts/machines leads to additional maintenance requirements.
Virtual Machines
Virtualization, in a simple sense, is an abstraction of real (i.e. typically physical) resources. For example, virtual machines are abstractions of “real” machines which can run an entire operating system plus system applications, with the system being under the impression it’s running on real/physical hardware, when in reality, it is communicating with virtual hardware (that eventually communicates, through layers of abstraction/translation, to the actual underlying physical/real hardware).
This allows, for example, someone running Ubuntu Linux for a 64-bit Intel processor (i.e. a “real PC”, running what is referred to as the “host OS”), to run a virtualized instance of the Windows XP operating system (i.e. a “virtual PC”, running what is referred to as the “guest OS) as if it were just another application. Such setups are extremely useful, as it allows a host OS to run applications for a completely different CPU/architecture and/or OS, without requiring the actual hardware (which may no longer be available due to production ceasing) to run the guest OS and the applications it supports. This typically comes with a cost: virtualization is expensive in terms of CPU and memory overhead. Provided that the virtualization software itself is maintained, one could run an old legacy application for a long-dead architecture years after hardware is no longer available (though, ideally, one would not allow a critical business element to rely on end-of-life unsupported software long-term).
History and Hypervisors
While virtualization in the field of computer science has been around for a long time (e.g. the evolution of the IBM CP-40 into the CP-67 in the 1960s, allowing for multiple concurrent application execution [1]), we will focus primarily on a cursory analysis of more recent developments, particularly in the context of VMs and containers.
With this in mind, we introduce the concept of a hypervisor (also referred to as a virtual machine monitor, or VMM): specialized software used to virtualize (i.e. abstract) an OS. The primary responsibilities of the hypervisor are to provide (for the guest OS) abstractions of hardware (i.e. virtual hardware that eventually maps to real hardware), and to handle or “trap” system calls (APIs provided by an operating system for requesting specific, usually privileged, functionality from the kernel; [2]).
Diving further into hypervisors, there are two types of hypervisor (well, three, but two of relevance to this chapter): “type 1” and “type 2” hypervisors. First, with type 2 hypervisors, a simplified summary would be that type 2 hypervisors require various operations to be delegated or otherwise translated by the host OS on behalf of the guest OS. This results in a “true virtualization” of the guest OS, at the expense of increased overhead (and by extension, decreased performance by the guest OS). If we consider Fig. 2 [3], the guest OS will run (typically, not always the case) in ring 3, and operations such as system calls and hardware access are trapped by the host OS (whose kernel is the sole software entity with access to ring 0).
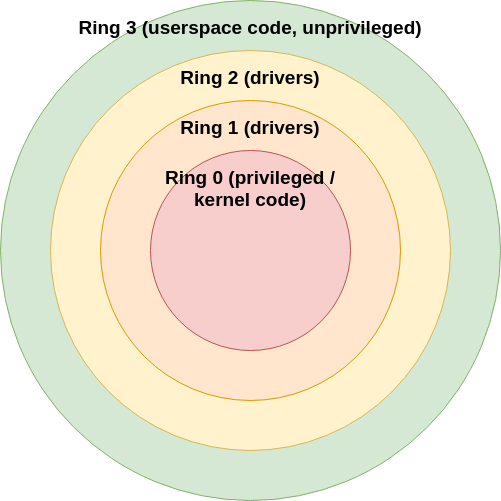
Fig. 2 Protection rings on Intel architecture.
In the case of a type 1 hypervisor, additional hardware support in the CPU (i.e. Intel VT-x “Vanderpool” or AMD V “Pacifica”, and their modern successors/counterparts) allows for the guest OS to have direct access to the underlying physical hardware, permitting for a drastic improvement in performance. If we consider Fig. 3, in the context of a type 1 hypervisor, the guest OS, still running in ring 3, is able to access the hardware in a much more direct manner through the hypervisor. It is worth noting that, in actuality, there are only really 4 rings (i.e. 0, 1, 2, and 3). The negative rings are really all processor features/extensions that are applied to or otherwise relate to ring 0. In any case, the key takeaway is that a type 1 hypervisor allows for improved performance through reduced overhead.
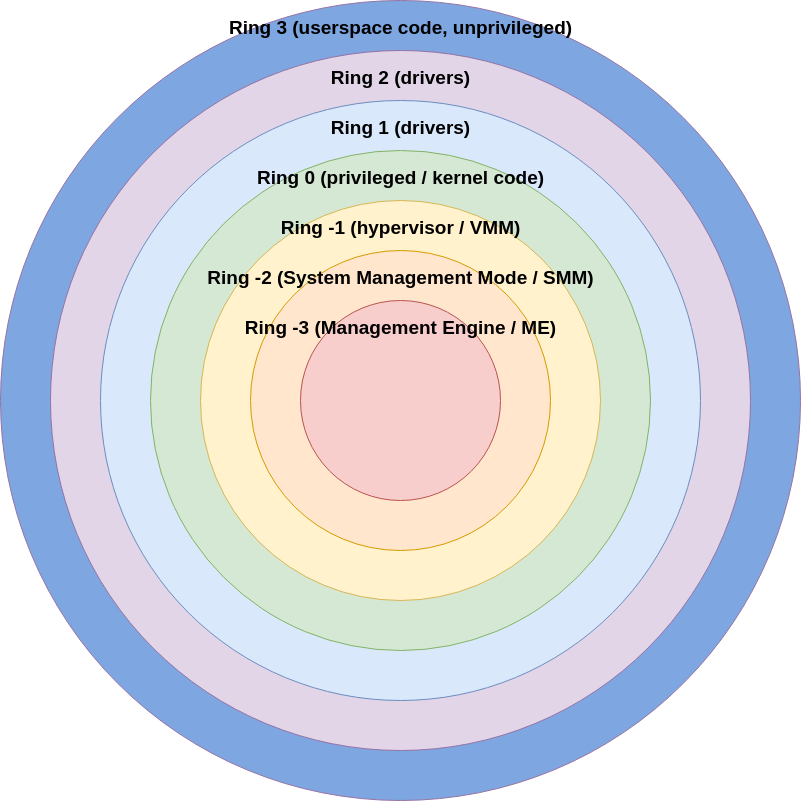
Fig. 3 Protection rings on Intel architecture (real and synthetic).
So, we’ve established that VMs allow for a convenient way to run software intended for combinations of CPU architectures and OSs in a guest OS, even if it differs wildly from the host OS. VMs are also portable as a side effect of this (i.e. pre-built VM setups can be easily copied between different physical host machines and re-used, provided the varying machines have the appropriate virtualization software present), allowing for varying degrees of scalability as well. This this being said, we will move on to the topic of containers.
Containers can be thought of as “lightweight virtual machines”. Rather than
employing the use of a hypervisor, containers are essentially means of running
software on the host OS in private, isolated environments. A very
primitive approach to containers, known as a “chroot jail”, has been
available for nearly 20 years now (at the time of the writing of this
document). However, containers employ a greater degree of control and
protection mechanisms, using three particularly useful Linux features:
Namespaces (i.e. for isolation of file systems, hostnames, IPC, network resources, etc. [4]).
Control groups, or “cgroups” (i.e. for logically grouping processes and applying monitor and limits on them, such as quotas on CPU and RAM usage, for example).
Union mounts (i.e. a means of taking multiple folders and “stacking” them to create a virtual abstraction of the contents of all the folders in aggregate).
Through the use of these Linux-specific pieces of functionality, isolated execution environments, referred to as “containers”, can allow for applications to run securely and independently from each other, relatively oblivious to the fact that they are executing within a container framework. The lack of a hypervisor and the associated virtualization mechanisms means that there is a significant improvement in performance over traditional virtualization solutions [5] [6] [7].
Note
These container technologies can be utilized on non-Linux operating systems such as Apple’s OSX, or Microsoft Windows; but they are actually containers running within a hypervisor-based virtualization solution, so a massive amount of additional overhead is incurred on non-Linux systems. This has the unfortunate consequence of negating most of the benefits containers supply, namely improved performance and no need for a hypervisor.
There is one potential downside to this: the containers directly re-use the same kernel as the host operating system (i.e. Linux). If one wishes to use different kernel-specific features and drivers, for example, the host OSs kernel must support it, or it won’t be available to applications/services running within the containers. It also implies that the software running in the containers must be compiled for the same CPU architecture and OS as the host OS. There is a loss of portability, but the trade-off is a significant boost in performance and an astounding increase in scalability (more on this when we discuss K8S and cluster orchestration in later sections).
With the topics of VMs and containers being briefly covered, let’s move on to applications making use of the aforementioned technologies. Should the reader wish to go into this topic in greater detail, please refer to [1] and [8].
Single VM with Vagrant
Note
This section just scratches the surface on the topic of VMs. Tools such as Terraform [9], for example, can be used to provision entire cloud infrastructure deployments in environments such as Amazon EC2, Microsoft Azure, Google GCP, etc.; and can deploy virtul machines at scale efficiently and effectively. While the rest of this chapter focuses heavily on containers and K8S, don’t disqualify the use of VMs, especially in off-site cloud environments like the aforementioned service providers.
At least topically, using a single VM as a builder appears to be very similar to bare metal builder:
Both represent a complete appliance/host, with a dedicated operating system (albeit virtualized).
Both require tooling such as configuration management to keep them up-to-date and secure.
Both can be controlled in similar manners (i.e. via a graphical window manager or connecting via command line tools like
ssh).
Where VMs really shine is in their provisioning and portability.
Using tools like HashiCorp vagrant [10], for example, one may
write scripts in a structured and standardized manner to produce a virtual
machine on-demand. Rather than manually creating a virtual machine and
provisioning it (i.e. configuring an ISO image containing the guest
OSs installation files as a virtual optical drive, “connecting” it
to the VM, installing the guest OS and relevant applications,
configuring said applications, etc.), one can download pre-created (and
verified/trusted) images for common platforms such as various Linux
distributions (i.e. Ubuntu, Arch, Fedora, etc.), and add customizations on
afterwards (i.e. additional/custom packages, scripts, pre-compiled binaries,
etc.). This removes one of the largest (and most tedious) steps involved in
provisioning a bare metal builder, and the final artifact (i.e. the VM
image itself) can be trivially copied from one physical host to another for
duplication and re-use (with the appropriate re-provisioning steps in place,
such as randomizing the MAC address of the network adapter and
resetting credentials, etc.).
In addition to being able to rapidly provision VMs rapidly, they
also lend themself to another especially helpful use case: ephemeral/throw-away
VMs. With a bare metal builder, chances are the intent is to
provision it, maintain it regularly, and eventually dispose of it when the need
arises. For such a setup, it is not desirable to have to re-provision it more
than necessary (i.e. if a persistent storage medium fails, for example).
However, there are cases where someone may wish to have a “fresh” deployment
every time a specific job is executed. For example, someone may have a project
that creates the installer (i.e. akin to a deb package for an Ubuntu/Debian
system, or a setup.exe for a Windows-based system), and has configured a
build pipeline to automatically perform builds of this tool when one of its
components change (i.e. in a git repository, due to a commit being pushed).
This is a sound strategy: automatically trigger unit and/or regression tests via the CI/CD infrastructure every time a change is introduced into the code base. If this automated testing is non-destructive (i.e. has minimal or no ability to adversely impact the host/machine used for testing), this is not a problem. However, if this testing is destructive (i.e. could corrupt the software loadout on a host/machine to the point of it outright requiring re-provisioning, including a re-installation of the OS), then it’s going to incur significant overhead by technical staff who now have to periodically repair/re-image the build host/machine. If we were to use a VM for this task, we could dramatically cut down on the overhead involved: just pre-create a “golden” (i.e. known to be in a good, working, valid state) VM, and make a copy of it every time a build job needs to be triggered (and run said job inside the copy of the “golden” VM image).
When the job has concluded, just delete/discard the modified image that was just used (after extracting build artifacts, logs, etc.; from it), and we’re done. This will ensure every build job will have the exact same initial conditions, cut down on the need for technical staff to re-provision physical hosts/machines, and due to the inherent portability of VMs, the “golden” image can be duplicated across a wide variety of machines (i.e. even with differing hardware): so long as they all support the same virtualization framework, they can all make use of the same “golden” image. With this said, let’s move on to an example where we’ll create an ephemeral/throw-away VM on-demand, use it to build a small C project, backup the build artifacts and logs, and then dispose of the VM image.
First, we’ll just create a new Vagrantfile via the command vagrant
init. Next, we’ll customize the minimal/baseline Vagrantfile to be a bit
more interesting (manually specify some options impacting performance,
configure it to use Ubuntu 20.04 “focal” as the baseline OS, and
configure it to use a provisioning script to install packages to the VM
before we begin using it).
Note
In addition to installing Vagrant (i.e. sudo apt install -y vagrant on
Ubuntu/Debian systems), the reader is also encouraged to install the
vbguest plugin to avoid various errors that will require the use of
researching via Google and StackOverflow to resolve (i.e.
vagrant plugin install vagrant-vbguest).
 1 # -*- mode: ruby -*-
 2 # vi: set ft=ruby :
 3
 4 # All Vagrant configuration is done below. The "2" in Vagrant.configure
 5 # configures the configuration version (we support older styles for
 6 # backwards compatibility). Please don't change it unless you know what
 7 # you're doing.
 8 Vagrant.configure("2") do |config|
 9   # The most common configuration options are documented and commented below.
10   # For a complete reference, please see the online documentation at
11   # https://docs.vagrantup.com.
12
13   # Every Vagrant development environment requires a box. You can search for
14   # boxes at https://vagrantcloud.com/search.
15   config.vm.box = "base"
16
17   # Disable automatic box update checking. If you disable this, then
18   # boxes will only be checked for updates when the user runs
19   # `vagrant box outdated`. This is not recommended.
20   # config.vm.box_check_update = false
21
22   # Create a forwarded port mapping which allows access to a specific port
23   # within the machine from a port on the host machine. In the example below,
24   # accessing "localhost:8080" will access port 80 on the guest machine.
25   # NOTE: This will enable public access to the opened port
26   # config.vm.network "forwarded_port", guest: 80, host: 8080
27
28   # Create a forwarded port mapping which allows access to a specific port
29   # within the machine from a port on the host machine and only allow access
30   # via 127.0.0.1 to disable public access
31   # config.vm.network "forwarded_port", guest: 80, host: 8080, host_ip: "127.0.0.1"
32
33   # Create a private network, which allows host-only access to the machine
34   # using a specific IP.
35   # config.vm.network "private_network", ip: "192.168.33.10"
36
37   # Create a public network, which generally matched to bridged network.
38   # Bridged networks make the machine appear as another physical device on
39   # your network.
40   # config.vm.network "public_network"
41
42   # Share an additional folder to the guest VM. The first argument is
43   # the path on the host to the actual folder. The second argument is
44   # the path on the guest to mount the folder. And the optional third
45   # argument is a set of non-required options.
46   # config.vm.synced_folder "../data", "/vagrant_data"
47
48   # Provider-specific configuration so you can fine-tune various
49   # backing providers for Vagrant. These expose provider-specific options.
50   # Example for VirtualBox:
51   #
52   # config.vm.provider "virtualbox" do |vb|
53   #   # Display the VirtualBox GUI when booting the machine
54   #   vb.gui = true
55   #
56   #   # Customize the amount of memory on the VM:
57   #   vb.memory = "1024"
58   # end
59   #
60   # View the documentation for the provider you are using for more
61   # information on available options.
62
63   # Enable provisioning with a shell script. Additional provisioners such as
64   # Puppet, Chef, Ansible, Salt, and Docker are also available. Please see the
65   # documentation for more information about their specific syntax and use.
66   # config.vm.provision "shell", inline: <<-SHELL
67   #   apt-get update
68   #   apt-get install -y apache2
69   # SHELL
70 end
 1 # -*- mode: ruby -*-
 2 # vi: set ft=ruby :
 3
 4 # All Vagrant configuration is done below. The "2" in Vagrant.configure
 5 # configures the configuration version (we support older styles for
 6 # backwards compatibility). Please don't change it unless you know what
 7 # you're doing.
 8 Vagrant.configure("2") do |config|
 9   # The most common configuration options are documented and commented below.
10   # For a complete reference, please see the online documentation at
11   # https://docs.vagrantup.com.
12
13   # Every Vagrant development environment requires a box. You can search for
14   # boxes at https://vagrantcloud.com/search.
15   config.vm.box = "ubuntu/focal64"
16
17   # Disable automatic box update checking. If you disable this, then
18   # boxes will only be checked for updates when the user runs
19   # `vagrant box outdated`. This is not recommended.
20   # config.vm.box_check_update = false
21
22   # Create a forwarded port mapping which allows access to a specific port
23   # within the machine from a port on the host machine. In the example below,
24   # accessing "localhost:8080" will access port 80 on the guest machine.
25   # NOTE: This will enable public access to the opened port
26   # config.vm.network "forwarded_port", guest: 80, host: 8080
27
28   # Create a forwarded port mapping which allows access to a specific port
29   # within the machine from a port on the host machine and only allow access
30   # via 127.0.0.1 to disable public access
31   # config.vm.network "forwarded_port", guest: 80, host: 8080, host_ip: "127.0.0.1"
32
33   # Create a private network, which allows host-only access to the machine
34   # using a specific IP.
35   # config.vm.network "private_network", ip: "192.168.33.10"
36
37   # Create a public network, which generally matched to bridged network.
38   # Bridged networks make the machine appear as another physical device on
39   # your network.
40   # config.vm.network "public_network"
41
42   # Share an additional folder to the guest VM. The first argument is
43   # the path on the host to the actual folder. The second argument is
44   # the path on the guest to mount the folder. And the optional third
45   # argument is a set of non-required options.
46   # config.vm.synced_folder "../data", "/vagrant_data"
47
48   # Provider-specific configuration so you can fine-tune various
49   # backing providers for Vagrant. These expose provider-specific options.
50   # Example for VirtualBox:
51   #
52   config.vm.provider "virtualbox" do |vb|
53     # Display the VirtualBox GUI when booting the machine
54     # Nah, let's do everything via console/shell/command-line.
55     vb.gui = false
56
57     # Customize the amount of memory on the VM:
58     vb.memory = "2048"
59
60     # Add more cores.
61     vb.cpus = 2
62   end
63
64   # Run our deployment script during `vagrant up --provision` (or first
65   # `vagrant up`) operation.
66   config.vm.provision "shell", path: "deploy.sh"
67
68   # View the documentation for the provider you are using for more
69   # information on available options.
70
71   # Enable provisioning with a shell script. Additional provisioners such as
72   # Puppet, Chef, Ansible, Salt, and Docker are also available. Please see the
73   # documentation for more information about their specific syntax and use.
74   # config.vm.provision "shell", inline: <<-SHELL
75   #   apt-get update
76   #   apt-get install -y apache2
77   # SHELL
78 end
 1 --- /work/examples/build_patterns/vm_example/Vagrantfile.original
 2 +++ /work/examples/build_patterns/vm_example/Vagrantfile
 3 @@ -12,7 +12,7 @@
 4
 5    # Every Vagrant development environment requires a box. You can search for
 6    # boxes at https://vagrantcloud.com/search.
 7 -  config.vm.box = "base"
 8 +  config.vm.box = "ubuntu/focal64"
 9
10    # Disable automatic box update checking. If you disable this, then
11    # boxes will only be checked for updates when the user runs
12 @@ -49,14 +49,22 @@
13    # backing providers for Vagrant. These expose provider-specific options.
14    # Example for VirtualBox:
15    #
16 -  # config.vm.provider "virtualbox" do |vb|
17 -  #   # Display the VirtualBox GUI when booting the machine
18 -  #   vb.gui = true
19 -  #
20 -  #   # Customize the amount of memory on the VM:
21 -  #   vb.memory = "1024"
22 -  # end
23 -  #
24 +  config.vm.provider "virtualbox" do |vb|
25 +    # Display the VirtualBox GUI when booting the machine
26 +    # Nah, let's do everything via console/shell/command-line.
27 +    vb.gui = false
28 +
29 +    # Customize the amount of memory on the VM:
30 +    vb.memory = "2048"
31 +
32 +    # Add more cores.
33 +    vb.cpus = 2
34 +  end
35 +
36 +  # Run our deployment script during `vagrant up --provision` (or first
37 +  # `vagrant up`) operation.
38 +  config.vm.provision "shell", path: "deploy.sh"
39 +
40    # View the documentation for the provider you are using for more
41    # information on available options.
42
 1 #!/bin/bash
 2
 3 # Install some packages.
 4 sudo apt update -y
 5 sudo apt install -y \
 6     automake \
 7     binutils \
 8     cmake \
 9     coreutils \
10     cowsay \
11     gcc \
12     iftop \
13     iproute2 \
14     iputils-ping \
15     lolcat \
16     make \
17     net-tools \
18     nmap \
19     python3 \
20     python3-dev \
21     python3-pip \
22     toilet
23
24 # Some helpful python tools.
25 sudo pip3 install \
26     flake8 \
27     pylint
28
29 sudo apt clean -y
Now, we’ll launch our VM via vagrant up, and see what happens (lots
of console output is generated, so we’ll have to trim it to keep just the
relevant bits).
 1 # Start booting and configuring the VM.
 2 owner@darkstar$> vagrant up
 3 Bringing machine 'default' up with 'virtualbox' provider...
 4 ==> default: Importing base box 'ubuntu/focal64'...
 5 ==> default: Matching MAC address for NAT networking...
 6 ==> default: Checking if box 'ubuntu/focal64' version '20210803.0.0' is up to date...
 7 ==> default: Setting the name of the VM: vm_example_default_1628615617134_78200
 8 ==> default: Clearing any previously set network interfaces...
 9 ==> default: Preparing network interfaces based on configuration...
10     default: Adapter 1: nat
11 ==> default: Forwarding ports...
12     default: 22 (guest) => 2222 (host) (adapter 1)
13 ...
14 ...
15 ...
16
17 # Now it's successfully running our provisioning script.
18 The following additional packages will be installed:
19   binutils binutils-common binutils-x86-64-linux-gnu build-essential cpp cpp-9
20   dctrl-tools dpkg-dev fakeroot g++ g++-9 gcc gcc-9 gcc-9-base
21   libalgorithm-diff-perl libalgorithm-diff-xs-perl libalgorithm-merge-perl
22   libasan5 libatomic1 libbinutils libc-dev-bin libc6-dev libcc1-0 libcrypt-dev
23   libctf-nobfd0 libctf0 libdpkg-perl libfakeroot libfile-fcntllock-perl
24   libgcc-9-dev libgomp1 libisl22 libitm1 liblsan0 libmpc3 libquadmath0
25   libasan5 libatomic1 libbinutils libc-dev-bin libc6-dev libcc1-0 libcrypt-dev
26   libctf-nobfd0 libctf0 libdpkg-perl libfakeroot libfile-fcntllock-perl
27   libgcc-9-dev libgomp1 libisl22 libitm1 liblsan0 libmpc3 libquadmath0
28   libstdc++-9-dev libtsan0 libubsan1 linux-libc-dev make manpages-dev
29 0 upgraded, 43 newly installed, 0 to remove and 0 not upgraded.
30 Need to get 43.1 MB of archives.
31 After this operation, 189 MB of additional disk space will be used.
32 ...
33 ...
34 ...
35
36 # And we're eventually returned to our shell. Let's log in to the VM via SSH:
37 [10:14:57]: owner@darkstar$> vagrant ssh
38 Welcome to Ubuntu 20.04.2 LTS (GNU/Linux 5.4.0-80-generic x86_64)
39
40  * Documentation:  https://help.ubuntu.com
41  * Management:     https://landscape.canonical.com
42  * Support:        https://ubuntu.com/advantage
43
44   System information as of Tue Aug 10 17:22:57 UTC 2021
45
46   System load:  0.0               Processes:               119
47   Usage of /:   4.3% of 38.71GB   Users logged in:         0
48   Memory usage: 12%               IPv4 address for enp0s3: 10.0.2.15
49   Swap usage:   0%
50
51
52 1 update can be applied immediately.
53 To see these additional updates run: apt list --upgradable
54
55 # We're in: it works. Time to call it a day.
56 vagrant@ubuntu-focal:~$ logout
57 Connection to 127.0.0.1 closed.
Vagrant is a large topic that can encompass several books, so the reader is left to conduct their own research and learning/training exercises to become more versed in its use (if desired). The goal of this section has been accomplished: demonstrating how easy it is to rapidly prepare and deploy a VM via a tool like Vagrant (and using an IAC approach no less).
Note
Build pattern viability metrics.
Repeatable: very repeatable. Use of infrastructure-as-code techniques via Vagrantfiles allows us to achieve a high level of repeatability (similar to Docker containers; described later).
Reliable: generally reliable. Attempting to access specific hardware (e.g. USB-passthrough) can, in the author’s experience, lead to stability problems (although such use cases are never typically encountered when using VMs as dedicated builders, so it’s a moot point.
Maintainable: in the case of long-lived VMs, maintainable as long as configuration management is used (similar to bare metal hosts). In the case of ephemeral/throwaway VMs, very maintainable (similar to Docker containers, as we just invoke them on-demand, and discard them when no longer needed).
Scalable: generally scalable vertically (due to hardware acceleration being available for most hypervisors) and horizontally (i.e. via tools like Terraform). More resource overhead than containers, but still manageable.
Containers
One of the most (in recent memory) ubiquitous and useful patterns (in my own opinion) is container-based build patterns. As the following examples will show, they not only scale exceptionally well, but they are very easy to extend/manipulate to provide an assortment of features (without having to rely on VM vendor-specific functionality).
Single Container with Docker
Launching a single container interactively is very straightforward. We just need to make sure that Docker is installed [11]. In my own case, on an Ubuntu 20.04 installation, I simply needed to do the following:
Execute
sudo apt install docker.Add myself to the
docker groupso I could execute Docker commands without the use of thesudocommand, i.e:sudo usermod -a -G docker $(whoami), and then log out of all running sessions (or rebooting the machine might be easier).
In any case, please refer to the official Docker documentation [11] for guidance on installing Docker (on Linux; as noted earlier, this material focuses exclusively on Linux hosts). Now, let’s take the latest Ubuntu 20.04 “Focal” distro for a spin, by instantiating an interactive instance of it (for more details on the command line arguments, please see [12]).
 1 # Launch an interactive instance, and auto-cleanup when done.
 2 $> docker run -it --rm ubuntu:focal
 3
 4 Unable to find image 'ubuntu:focal' locally
 5 focal: Pulling from library/ubuntu
 6 16ec32c2132b: Already exists
 7 Digest:
 8 sha256:82becede498899ec668628e7cb0ad87b6e1c371cb8a1e597d83a47fac21d6af3
 9 Status: Downloaded newer image for ubuntu:focal
10
11 # Now we're in our container, in it's own dedicated virtual/throw-away
12 # file system. Let's look around.
13 root@016a95a884a3:/# ls -a
14 .  ..  .dockerenv  bin  boot  dev  etc  home  lib  lib32  lib64  libx32
15 media  mnt  opt  proc  root  run  sbin  srv  sys  tmp  usr  var
Keep in mind, when we’re using docker run (or docker exec) to
instantiate and run a shell in the container, we’re operating within a
throwaway file system (i.e. when the container instance is terminated, that
file system and the files present in it, even those we manually create, are
gone). Let’s start to fine tune our arguments to Docker to get more use out of
it. Let’s assume I’m currently logged in to my host OS as user
owner, on a machine with host name darkstar, and my home directory is
/home/owner. Let’s create a “staging area” for our Docker-related
experiments in /home/owner/work (the following examples will use the ~
literal and $HOME variable to avoid references to owner and/or
darkstar being hard-coded into them).
 1 # Create our staging path.
 2 owner@darkstar$> mkdir -p ~/work
 3
 4 # Change directory. Manually make sure no files are present here via "ls", so
 5 # we're not destroying data in case, by coincidence, you already have a
 6 # "~/work" directory on your host machine.
 7 owner@darkstar$> cd ~/work
 8
 9 # Launch our Docker container, but mount the current directory so that it's
10 # accessible from within the container. We can also use the "pwd" command
11 # instead of "readlink -f", but I prefer the latter for cases where
12 # additional mounts are needed, so a single command is used throughout the
13 # (lengthy) set of command-line arguments.
14 owner@darkstar$> $> docker run -it --rm \
15     --volume="$(readlink -f .):/work"
16     --workdir="/work"
17     ubuntu:focal
18
19 root@0c33ac445db4:/work# ls
20
21 root@0c33ac445db4:/work# touch foo
22
23 root@0c33ac445db4:/work# ls
24 foo
25
26 root@0c33ac445db4:/work# exit
27
28 owner@darkstar$> ls
29 foo
How exciting: the file we created via the touch command within our
container survived the termination of the container, and is accessible to the
current user session on the host OS. Let’s take another step forward:
let’s actually build something within the container. We’ll create the following
two files within the current directory (i.e. CWD or PWD):
Makefile and helloworld.c (the programming language doesn’t really
matter, and the example we’re demonstrating is just a C-specific minimal “hello
world” example, so there’s no need to be versed in the C programming language
to proceed).
1 .DEFAULT_GOAL: all
2 .PHONY: all
3 all:
4         gcc helloworld.c -o helloworld_app
1 #include <stdio.h>
2 int main(void) {
3     printf("Hello world!\n");
4     return 0;
5 }
Now, let’s attempt to manually compile our source file via GNU make within
our container.
 1 # Launch our Docker container, but mount the current directory so that it's
 2 # accessible from within the container. We can also use the "pwd" command
 3 # instead of "readlink -f", but I prefer the latter for cases where
 4 # additional mounts are needed, so a single command is used throughout the
 5 # (lengthy) set of command-line arguments.
 6 owner@darkstar$> $> docker run -it --rm \
 7     --volume="$(readlink -f .):/work"
 8     --workdir="/work"
 9     ubuntu:focal
10
11 # Confirm our files are present (after creating them on the host OS in
12 # "~/work"): looks good.
13 root@f2fb4aeecfbc:/work# ls
14 Makefile  foo  helloworld.c
15
16 # Build our app.
17 root@f2fb4aeecfbc:/work# make
18 bash: make: command not found
19
20 # That's not good: let's try building directly via "gcc":
21 root@f2fb4aeecfbc:/work# gcc helloworld.c -o helloworld_app
22 bash: gcc: command not found
23
24 # Still no good. Well, let's try installing these apps.
25 root@f2fb4aeecfbc:/work# apt install make gcc
26 Reading package lists... Done
27 Building dependency tree
28 Reading state information... Done
29 E: Unable to locate package make
30 E: Unable to locate package gcc
31
32 # Oh yeah: need to update our apt cache, as it will be empty by default in a
33 # "fresh" container.
34
35 root@f2fb4aeecfbc:/work# apt update -q && apt install make gcc
36 Hit:1 http://security.ubuntu.com/ubuntu focal-security InRelease
37 Hit:2 http://archive.ubuntu.com/ubuntu focal InRelease
38 Hit:3 http://archive.ubuntu.com/ubuntu focal-updates InRelease
39 Hit:4 http://archive.ubuntu.com/ubuntu focal-backports InRelease
40 ...
41 ...
42 ...
43 Need to get 33.3 MB of archives.
44 After this operation, 139 MB of additional disk space will be used.
45 Do you want to continue? [Y/n]
46
47 # Why not: let's install the packages (Y).
48
49 # Now, we should be able to build and run our app in this container.
50 root@f2fb4aeecfbc:/work# make
51 gcc helloworld.c -o helloworld_app
52
53 root@f2fb4aeecfbc:/work# ls -la
54 total 36
55 drwxrwxr-x 2 1000 1000  4096 Aug  1 17:43 .
56 drwxr-xr-x 1 root root  4096 Aug  1 17:37 ..
57 -rw-rw-r-- 1 1000 1000    72 Aug  1 17:37 Makefile
58 -rw-r--r-- 1 root root     0 Aug  1 17:23 foo
59 -rw-rw-r-- 1 1000 1000    77 Aug  1 17:37 helloworld.c
60 -rwxr-xr-x 1 root root 16704 Aug  1 17:43 helloworld_app
61
62 root@f2fb4aeecfbc:/work# ./helloworld_app
63 Hello world!
64
65
66 root@f2fb4aeecfbc:/work# exit
Well, that was interesting: it turns out that these “baseline” Docker images for various Linux distributions (also referred to as “distros”) are quite minimal in terms of packages present. We were able to manually install the needed packages however, and eventually build and run our example. Now, go ahead and re-run the example we just finished: notice anything odd/unexpected?
Note
Please go ahead and re-run the example. What is amiss?
As you’ve likely noticed, you need to re-install make and gcc again.
While the files in /work within the container survive container termination
(due to the volume mount we have in place), the rest of the container
(including packages we’ve installed to places like /usr within the
container) do not (this is by design, as containers are intended to generally
be throwaway/ephemeral; anything intended for long-term storage needs to be
backed up or otherwise exported via mounts or some other means of exporting the
data from the running container). Well, this is going to consume a large amount
of bandwidth and slow down our build process if we want to repeatedly re-build
our example (and not keep the same container instance “live” indefinitely).
Fortunately, we can easily extend our baseline Ubuntu container to have some
modifications that will be helpful to us. Let’s create a new file named
Dockerfile in the PWD, and populate it like so:
1 FROM ubuntu:focal as baseline
2
3 # System packages.
4 RUN apt update -y && \
5     apt install -y \
6         make \
7         gcc \
8     && \
9     apt clean -y
The key things to keep in mind are that we’re using “ubuntu:focal” as our
baseline image (“baseline” is just an arbitrary name I chose, it’s not a
Dockerfile primitive/keyword), and we’re using apt to install the extra
packages we need. The remaining code (i.e. multi-line apt usage, apt
clean, etc.) are just “common/best practises” to reduce the size of the
overall image (i.e. optimizations), and are covered in a later section. It’s
also worth noting that I will typically refer to “Docker containers” as
live/running instances of “Docker images”, while “Docker images” are the static
build artifacts produced by docker build operations (i.e. “Docker
containers are live instantiations of Docker images”), to avoid ambiguity.
Now, let’s build the Dockerfile to produce an image we can use (pay attention
to the period . literal on the final line: it’s not a typo; you can also
replace it with ./ if desired for better readability):
1 # Build our image.
2 DOCKER_BUILDKIT=1 docker build \
3 -t "my_docker_builder:local" \
4 --target baseline \
5 -f Dockerfile \
6 .
7
8 # Confirm it exists.
9 owner@darkstar$> docker image ls
10 REPOSITORY TAG IMAGE ID CREATED
11 SIZE
12 my_docker_builder latest 5dd3b898dfc1 31 seconds ago
13 233MB
Note
The reader may notice the use of the DOCKER_BUILDKIT environment
variable [13], along with manually specifying the path
to the Dockerfile via the -f command-line argument. This is to allow for
custom Dockerfile and .dockerignore [14], file
names
[15], greatly increasing build speeds (i.e. reducing
build times/duration), providing increased security against accidentally
bundling files unintentionally, [16], etc. The reader is
encouraged to futher investigate these techniques if not already familiar
with them, as a minor change to project structure can greatly improve the
security and velocity of builds.
Now, let’s repeat the earlier make example, but use our newly-minted
container rather than the “vanilla” (i.e. un-modified) ubuntu:focal image.
1 # Launch our Docker container, but mount the current directory so that it's
2 # accessible from within the container. We can also use the "pwd" command
3 # instead of "readlink -f", but I prefer the latter for cases where
4 # additional mounts are needed, so a single command is used throughout the
5 # (lengthy) set of command-line arguments.
6 owner@darkstar$> $> docker run -it --rm \
7 --volume="$(readlink -f .):/work"
8 --workdir="/work"
9 my_docker_builder:local
10
11 # Confirm our files are present (after creating them on the host OS in
12 # "~/work"): looks good. Let's remove the binary we compiled in our previous
13 # run to make sure we're really building it from source correctly.
14 root@6b60e799f6dc:/work# ls
15 Dockerfile Makefile foo helloworld.c helloworld_app
16
17 root@6b60e799f6dc:/work# rm helloworld_app
18
19 root@6b60e799f6dc:/work# make
20 gcc helloworld.c -o helloworld_app
21
22 root@6b60e799f6dc:/work# ./helloworld_app
23 Hello world!
24
25 root@6b60e799f6dc:/work# exit
Hurrah! We now have a Docker image with the necessary tools present to build
our application, without having to re-download them every time (saving
bandwidth, decreasing the amount of time our build takes, and allowing this
build process to work in environments without internet access, which would be
necessary for downloading packages via apt). This Docker image can be used
for local builds, as well as builds via CI/CD pipelines with tools like
GitHub, Jenkins, GitLab, etc. At this point, the reader is strongly encouraged
to review the use of docker push ([17],
[18]) to learn how to back up your Docker images for long-term
re-use (and for sharing them with colleagues and team members).
As a final example for this section, we leave the reader with a sample script
they are encouraged to use with the source listings we’ve used, as a matter of
convenience, e.g. iax.sh (the file name is arbitrary; please pick an
alternative at your own discretion; also be sure to make it executable via
chmod +x iax.sh).
1 #!/bin/bash
2 ################################################################################
3 # @brief: Docker-bootstrap script for building projects via a Docker
4 # image.
5 ################################################################################
6
7 # Docker runtime image to use for building artifacts.
8 DOCKER_IMG="my_docker_builder:local"
9
10 # Launch docker container. Setup PWD on host to mount to "/work" in the
11 # guest/container.
12 docker run \
13 --rm -it \
14 --volume="$(readlink -f .):/work:rw" \
15 --workdir="/work" \
16 ${DOCKER_IMG} \
17 ${@}
What use is this compared to the commands we’ve already been using so far? Well, there are four important consequences of using a launcher script like this:
Without any arguments, it just launches an interactive instance of your container, like how we’ve been doing throughout this section (i.e. less typing).
If arguments are passed to the container, it will run them as a non-interactive job, and terminate the container instance when done. For example, try executing something like
./iax.sh make, and the script will launch themakecommand within the container, and then terminate the container, while leaving the build artifacts behind on your host OS (very handy if you want to script/batch builds and other operations in an automated, non-interactive manner using your builder containers).You can add a lot of other complex options (some of which will be covered in later sections) to get more functionality out of the script, without requiring users of the script (i.e. other team members) to have to memorize a copious amount of Docker command-line arguments.
The script can be modified to reflect the behavior of your CI/CD build system, to minimize differences between local/developer builds of a project, and builds launched on dedicated infrastructure as part of your CI/CD pipeline (i.e. no more cases of build-related bugs occurring and the response being “but it worked on my machine!”). Less headaches for developers thanks to pro-active, user-friendly infrastructure design by DevOps.
Note
Build pattern viability metrics.
Repeatable: very repeatable.
Reliable: very reliable, provided the host OS itself is stable.
Maintainable: yes, especially when most uses of containers are throwaway/ephemeral, as we just create new instances when needed, rather than maintaining old instances long-term.
Scalable: extremely scalable, especially when tools like K8S are added to the mix. More on such topics in later sections.
Multiple Containers with Docker
This use case is nearly identical to the single container user case (i.e. Single Container with Docker). CI/CD frameworks like GitHub, GitLab, etc.; support building applications in containers, and also support building different portions of a project/pipeline in different containers (e.g. consider a project with a C and a Go/Golang sub-project in it, and for the sake of convenience, the two sub-projects are built with different dedicated Docker images).
The one place where this can become a bit tedious is when handling the case of
local developer builds. Using a launcher script like the iax.sh script is
great if everything needs to be built under the same container (e.g. one can
just execute ./iax.sh make and have an entire project build end-to-end
without any further user interaction). However, this pattern no longer works if
different images need to be used throughout the build pipeline, as we’d need to
execute different stages of the build with different launcher scripts (i.e.
boilerplate copies of iax.sh: one per builder image needed).
One off-the-cuff solution to this would be to have a top-level shell script that launches (in the case of local/developer builds) various stages of the pipeline in different containers (example shown below).
1 # Launch our "C builder" to build a sub-directory in the PWD.
2 ./iax_c.sh cd c_sub_project && make
3
4 # Do the same, for a Go sub-project with our "Go builder".
5 ./iax_golang.sh cd go_sub_project && make
While this works, it has several issues with respect to maintainability (even if it seems fine according to our build pattern viability metrics). Namely:
The top-level build script isn’t launching within a container, so it immediately becomes less portable due to certain requirements (besides the existence of Docker) being present on the host OS. This may seem trivial, but can be very frustrating if suddenly the host OS requires a specific version of a specific tool like
cmake,scons, etc.; present, and is further compounded if developers are using different distros/versions and these tools aren’t available for the required combination of distro, tool version, etc. In short, we can avoid a lot of headache and frustration by ensuring the entirety of the build process is somehow “wrapped” via containers or some other virtualization technology.We need to have near-duplicate copies of the launcher script for each build image we support. They can easily drift (i.e. they become dissimilar from each other) over time, or as boilerplate copies are duplicated into other projects.
The top-level build tool (generally, in the case of local/developer builds) has to be a specific tool (i.e.
bashor some other interpreter). It prevents the (trivial) use of tools likemakeas the top-level build tool, which can prevent better (more optimal) means of building software.Executing incremental builds puts additional cognitive load on developers/engineers as they conduct their day-to-day tasks (i.e. “one more corner-case to remember”), as they have to possess a more intricate knowledge of the build chain for local/developer builds (i.e. “a shell script launches some more shell scripts that launch Makefiles in different containers for different sub-projects in the top-level project…”). Simplicity and ease-of-use are paramount for adoption.
With all this said, multiple container (i.e. serialized) builds are a perfectly
viable pattern, but some serious thought needs to be put into how it will be
presented to the consumer of these systems and scripts (i.e. development teams)
so that it is helpful rather than a hindrance to day-to-day development tasks.
Since the top-level build script is not containerized, it should ideally be
something portable that works across multiple Linux distros and versions (e.g.
bash or a specific version of python3, for example).
Note
Build pattern viability metrics.
Repeatable: very repeatable, but the difference between local/developer builds and CI/CD pipeline builds may result in additional work/load for individual contributors.
Reliable: very reliable, provided the host OS itself is stable.
Maintainable: yes, similar to single container use case.
Scalable: extremely scalable, especially when tools like K8S and docker-compose are added to the mix. More on these in later sections.
Nested Containers with Docker-in-Docker
While more complex in nature (not by too much, I promise), a nested Docker or “Docker-in-Docker” (DIND) provides the best of both the single container and multiple container uses cases for a build pattern, with a modest increase in complexity, and, very specific security requirements, as we’ll be exposing the Docker socket (a UDS type of socket) to the top-level container. In such cases, the top-level container should be invoked from a trusted, verified, (and usually built in-house) Docker image.
Additionally, to clear up some terminology, there are at least two ways (at this time, excluding solutions that encapsulate containers in VMs) to run nested containers or “Docker-in-Docker”:
“Docker-in-Docker via
dind[19]: a dedicated Docker image designed to allow for nested Docker deployments. Targeted primarily at use cases involving the development and testing of Docker itself.“Sharing the Docker socket” via mounting
/var/run/docker.sockin “child” containers.
For the sake of our analysis of build patterns, we’ll focus on the latter of
the two approaches noted above. Also, to avoid ambiguity, I will use
DIND to refer to the general approach of nested containers or
“Docker-in-Docker”, while the term (in monospaced font) of dind refers to
the specific “Docker-in-Docker” implementation covered in [19]
(which likely won’t be mentioned much more, if at all, in the rest of this
book). The use of this approach (i..e “sharing the Docker socket”) is quite
straightforward: we just launch a Docker container while mounting the Docker
UDS (i.e. API entry point for communicating with Docker) in the
top-level container we launch. This allows the top-level container to launch
additional “child” containers (well, “sibling” containers actually; more on
that later), which it could not accomplish without the use of this command-line
argument. To use this feature, we just add the following to our docker run
invocation, and we’re all set:
--volume="/var/run/docker.sock:/var/run/docker.sock:rw"
Warning
This option (i.e. mounting /var/run/docker.sock within a container)
should only be used in specific circumstances where its use is needed
and justified (i.e. build infrastructure that’s only executing safe/trusted
code and containers, local development use with safe/trusted environments,
the DevOps engineers maintaining the system are aware that containers
running with this capability effectively have root control over the host
OS and all the security implications that go along with it, etc.).
This functionality should not be enabled in a non-hardened/isolated environment, as it is easily exploited to allow for priviledge esclatation and eventual compromise of the machine (and even encompassing infrastructure) [20] [21] [22] [23]. This being said, many common, modern CI/CD systems [24] [25]: either support or even advise (under specific circumstances) the use of such an approach. While acknowledging the usefulness of this approach and its security implications, I’ve elected to not qualify the approach overall, and will instead focus on how it is used as a build pattern. The reader is free to draw their own conclusion with respect to whether or not the utility provided by such a method warrants the extra security policies/implementations required to lock it down.
Also, the version of Docker installed within the container itself must be API-compatible with that running on the host OS, so there is at least that requirement on the host OS in terms of software loadout.
With all this being said, all of the examples in this chapter make use of “rootless Docker” at every step along the way, even when using “Docker-in-Docker”, “Kubernetes-in-Docker”, etc. This greatly mitigates the aforementioned concerns.
Now, for actually using this approach to execute a build operation.
1 # Docker runtime image to use for building artifacts.
2 DOCKER_IMG="ubuntu:focal"
3
4 # Launch docker container with DIND capabilities.
5 docker run \
6 --rm -it \
7 --volume="$(readlink -f .):/work:rw" \
8 --workdir="/work" \
9 --volume="/var/run/docker.sock:/var/run/docker.sock:rw" \
10 ${DOCKER_IMG} \
11 ${@}
12
13 # Confirm we can see some files from the host OS.
14 root@9ad1796a0ef5:/work# ls -la
15 total 24
16 drwxrwxr-x 2 1000 1000 4096 Aug 3 21:28 .
17 drwxr-xr-x 1 root root 4096 Aug 3 21:28 ..
18 -rw-rw-r-- 1 1000 1000 150 Aug 1 17:57 Dockerfile
19 -rw-rw-r-- 1 1000 1000 72 Aug 1 17:37 Makefile
20 -rw-rw-r-- 1 1000 1000 77 Aug 1 17:37 helloworld.c
21 -rwxrwxr-x 1 1000 1000 571 Aug 1 18:25 iax.sh
22
23 # Done.
24 root@9ad1796a0ef5:/work# exit
25 exit
Great: we’ve re-enacted our single container use case. Now, let’s attempt to
launch another container, the “child” container (depth is 1, as this is a
single level of nesting), from within the “parent” container (depth is 0, as it
was invoked directly from the host OS via docker run).
1 # Docker runtime image to use for building artifacts (parent image).
2 DOCKER_IMG="ubuntu:focal"
3
4 # Launch parent docker container with DIND capabilities.
5 docker run \
6 --rm -it \
7 --volume="$(readlink -f .):/work:rw" \
8 --workdir="/work" \
9 --volume="/var/run/docker.sock:/var/run/docker.sock:rw" \
10 ${DOCKER_IMG} \
11 ${@}
12
13 # Confirm we can see some files from the host OS.
14 root@b9b5d9166edf:/work# ls -la
15 total 24
16 drwxrwxr-x 2 1000 1000 4096 Aug 3 21:28 .
17 drwxr-xr-x 1 root root 4096 Aug 3 21:28 ..
18 -rw-rw-r-- 1 1000 1000 150 Aug 1 17:57 Dockerfile
19 -rw-rw-r-- 1 1000 1000 72 Aug 1 17:37 Makefile
20 -rw-rw-r-- 1 1000 1000 77 Aug 1 17:37 helloworld.c
21 -rwxrwxr-x 1 1000 1000 571 Aug 1 18:25 iax.sh
22
23 # Confirm this is Ubuntu "Focal" (i.e. 20.04 LTS).
24 root@b9b5d9166edf:/work# cat /etc/lsb-release
25 DISTRIB_ID=Ubuntu
26 DISTRIB_RELEASE=20.04
27 DISTRIB_CODENAME=focal
28 DISTRIB_DESCRIPTION="Ubuntu 20.04.2 LTS"
29
30 # Make sure our host OS files are visible: check.
31 root@b9b5d9166edf:/work# ls
32 Makefile README.md diagrams.drawio doc google2b0f328e0f93c24f.html
33 iax.sh
34
35 # Launch child container (no need to also give it DIND capabilities, in this
36 # case).
37 # Docker runtime image to use for building artifacts (child image).
38 DOCKER_IMG_CHILD="debian:buster"
39 docker run \
40 --rm -it \
41 --volume="$(readlink -f .):/work:rw" \
42 --workdir="/work" \
43 ${DOCKER_IMG_CHILD} \
44 ${@}
45
46 bash: docker: command not found
47 # Oh? Seems the "docker" package isn't bundled into "baseline" container
48 # images by default (not typically needed, consumes extract space, etc.).
49
50 # Done, for now.
51 root@b9b5d9166edf:/work# exit
52 exit
Well, that was a short exercise. Looks like we’ll need to define our own custom
“parent” or “top-level” Docker image rather than using a “vanilla” baseline
image. While we’re at it, let’s define a custom “child” Docker image too, for
the sake of being thorough. First, let’s create the Dockerfiles for the parent
and child image, along with the relevant .dockerignore files too.
1 FROM ubuntu:focal as baseline
2
3 # System packages. Make sure "docker" is included.
4 RUN apt update -y && \
5 apt install -y \
6 docker.io \
7 jq \
8 lsb-release \
9 make \
10 gcc \
11 && \
12 apt clean -y
1 # Ignore everything by default. Have to manually add entries permitted
2 # for inclusion.
3 *
1 FROM debian:buster as baseline
2
3 # System packages.
4 RUN apt update -y && \
5 apt install -y \
6 jq \
7 lsb-release \
8 make \
9 gcc \
10 && \
11 apt clean -y
1 # Ignore everything by default. Have to manually add entries permitted
2 # for inclusion.
3 *
While we’re at it, let’s modify our Makefile to be able to build these
images, so we’re not constantly re-typing the docker build operations into
the console manually. Let’s include the docker run operations as goals we
can invoke as well.
1 # Defaults and global settings.
2 .DEFAULT_GOAL: all
3 PARENT_TAG=dind_example_parent:local
4 CHILD_TAG=dind_example_child:local
5
6 # Default goal (no longer builds C app, but can via manually running
7 # "make app").
8 .PHONY: all
9 all: docker_parent docker_child
10 @echo "Done build."
11
12 # Build parent Docker image.
13 .PHONY: docker_parent
14 docker_parent: Dockerfile.dind_example.parent Dockerfile.dind_example.parent.dockerignore
15 DOCKER_BUILDKIT=1 docker build \
16 -t "$(PARENT_TAG)" \
17 --target baseline \
18 -f Dockerfile.dind_example.parent \
19 .
20
21 # Build child Docker image.
22 .PHONY: docker_child
23 docker_child: Dockerfile.dind_example.child Dockerfile.dind_example.child.dockerignore
24 DOCKER_BUILDKIT=1 docker build \
25 -t "$(CHILD_TAG)" \
26 --target baseline \
27 -f Dockerfile.dind_example.child \
28 .
29
30 # Launch parent container.
31 .PHONY: run_parent
32 run_parent:
33 docker run \
34 --rm -it \
35 --volume="$(shell readlink -f .):/work:rw" \
36 --workdir="/work" \
37 --volume="/var/run/docker.sock:/var/run/docker.sock:rw" \
38 $(PARENT_TAG)
39
40 # Launch child container.
41 .PHONY: run_child
42 run_child:
43 docker run \
44 --rm -it \
45 --volume="$(shell readlink -f .):/work:rw" \
46 --workdir="/work" \
47 --volume="/var/run/docker.sock:/var/run/docker.sock:rw" \
48 $(CHILD_TAG)
49
50 # Build our C app.
51 .PHONY: app
52 app: helloworld_app
53 helloworld_app:
54 gcc helloworld.c -o $@
Alright then: let’s try this again.
1 # Launch the parent-level container.
2 owner@darkstar$> make run_parent
3 docker run \
4 --rm -it \
5 --volume="/home/owner/work:/work:rw" \
6 --workdir="/work" \
7 --volume="/var/run/docker.sock:/var/run/docker.sock:rw" \
8 dind_example_parent:local
9
10 # Nice! Let's verify the OS used by the parent-level container. Should be
11 # Ubuntu 20.04.
12 root@d1d839fde6d4:/work# lsb_release -a
13 No LSB modules are available.
14 Distributor ID: Ubuntu
15 Description: Ubuntu 20.04.2 LTS
16 Release: 20.04
17 Codename: focal
18
19 # Confirmed! Let's make sure we can see the files we mounted from the host
20 # OS.
21 root@d1d839fde6d4:/work# ls -a
22 . .. Dockerfile Dockerfile.dind_example.child Dockerfile.dind_example.child.dockerignore Dockerfile.dind_example.parent Dockerfile.dind_example.parent.dockerignore Makefile helloworld.c iax.sh
23
24 # So far, so good. Now let's try to launch the child container, since our
25 # parent-level container has Docker installed, and we're sharing the Docker
26 # socket with it.
27 root@d1d839fde6d4:/work# make run_child
28 docker run \
29 --rm -it \
30 --volume="/work:/work:rw" \
31 --workdir="/work" \
32 --volume="/var/run/docker.sock:/var/run/docker.sock:rw" \
33 dind_example_child:local
34
35 # This looks promising. Let's verify the child container is a Debian 10
36 # "Buster" release.
37 root@7662f05f4b1b:/work# lsb_release -a
38 No LSB modules are available.
39 Distributor ID: Debian
40 Description: Debian GNU/Linux 10 (buster)
41 Release: 10
42 Codename: buster
43
44 # Great! We have a parent-level container that can bootstrap our build
45 # process, and a child-level container that can run the actual build. Let's
46 # make sure our files are present.
47 root@7662f05f4b1b:/work# ls -a
48 . ..
49
50 # Wait, what? None of our files are present. Time to debug. Exit child
51 # container.
52 root@7662f05f4b1b:/work# exit
53 exit
54
55 # Exit parent container.
56 root@d1d839fde6d4:/work# exit
57 exit
What happened here? We can wee from the console output of the make
run_child command that we’re mapping /work within the parent container to
/work in the child container, and from the output of the make
run_parent command that we’re mapping the PWD in the host OS
to /work in the parent container. By transitivity, we should expect that
mounting PWD (host OS) to /work (parent container) to
/work (child container) should expose the files on our host OS to
the child container. This doesn’t appear to be the case: we only get as far as
making files on the host OS visible to the parent container. What
happened?
Well, as it turns out, “Docker-in-Docker” or “nested containers”, can be a bit of a misnomer. Even though we use terms like “parent container” and “child container”, from an implementation perspective (i.e. “under the hood”), child containers might be better described as “sibling” containers. Consider Fig. 4 - this looks roughly what one may imagine represents the concept of “nested containers”: the parent container runs directly from the host OS, and the child container runs within the parent container.
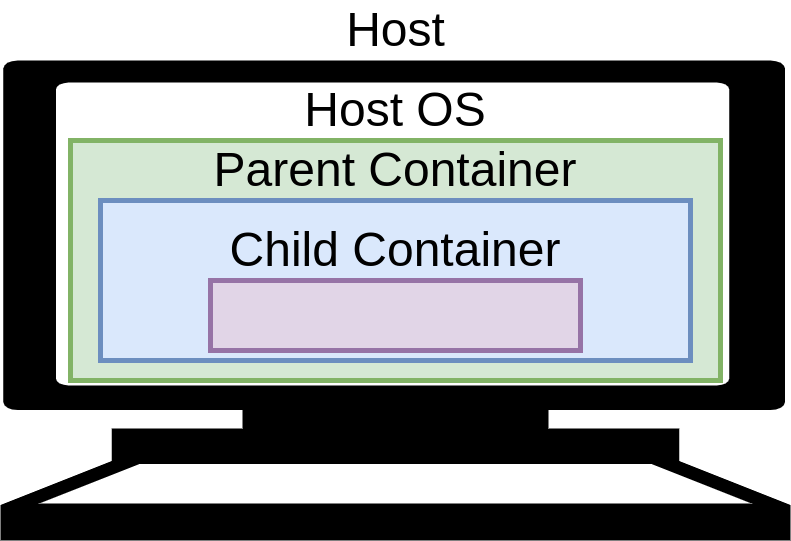
Fig. 4 Conceptual model (incorrect, as it turns out) for nested containers.
This assumption turns out to be incorrect, and in actuality, the “topology” of our containers is closer to that of Fig. 5.

Fig. 5 Model (approximate) for sibling (i.e. “nested”) containers.
So, what does this all mean? For a in-depth summary, the reader is encouraged
to review [1], but for now, the key takeaway is this: if we want a
mount point that is visible within the parent container to be visible in the
child container, the volume mount options passed to the docker run
invocation of the child container must match those that were passed to the
parent container. For example, in our most recent attempt to use nested
containers, notice the different in the volume mount commands:
1 # Parent container.
2 docker run \
3 ...
4 ...
5 --volume="/home/owner/work:/work:rw" \
6 --workdir="/work" \
7 ...
8 ...
9
10 # Child container.
11 root@d1d839fde6d4:/work# make run_child
12 docker run \
13 ...
14 ...
15 --volume="/work:/work:rw" \
16 --workdir="/work" \
17 ...
18 ...
If we were to somehow pass the same --volume command used for the parent
container, to the child container’s invocation, we can make the files in
/home/owner/work visible to both the parent container and the child
container. Ignoring the trivial approach of simply hard-coding the paths (our
project isn’t very portable anymore if we do that, since every developer that
checks out a copy of the project has to go modifying hard-coded paths, and
hopefully not committing said changes back to the shared repository). Rather,
let’s just pass the values used by the parent container invocation to the child
container’s invocation as environment variables. That should do the trick.
First, our modified Makefile:
1 # Defaults and global settings.
2 .DEFAULT_GOAL: all
3 PARENT_TAG=dind_example_parent:local
4 CHILD_TAG=dind_example_child:local
5
6 # For mounting paths in parent and child containers.
7 # Only set HOST_SRC_PATH if it's not already set. We expect the
8 # invocation/launch of the parent container to "see" this value as un-set,
9 # while the child container should already see it set via "docker run ... -e
10 # ...".
11 ifeq ($(HOST_PATH_SRC),)
12 HOST_PATH_SRC:=$(shell readlink -f .)
13 endif
14 HOST_PATH_DST:=/work
15
16 # Default goal (no longer builds C app, but can via manually running
17 # "make app").
18 .PHONY: all
19 all: docker_parent docker_child
20 @echo "Done build."
21
22 # Build parent Docker image.
23 .PHONY: docker_parent
24 docker_parent: Dockerfile.dind_example.parent Dockerfile.dind_example.parent.dockerignore
25 DOCKER_BUILDKIT=1 docker build \
26 -t "$(PARENT_TAG)" \
27 --target baseline \
28 -f Dockerfile.dind_example.parent \
29 .
30
31 # Build child Docker image.
32 .PHONY: docker_child
33 docker_child: Dockerfile.dind_example.child Dockerfile.dind_example.child.dockerignore
34 DOCKER_BUILDKIT=1 docker build \
35 -t "$(CHILD_TAG)" \
36 --target baseline \
37 -f Dockerfile.dind_example.child \
38 .
39
40 # Launch parent container.
41 .PHONY: run_parent_alt
42 run_parent_alt:
43 docker run \
44 --rm -it \
45 --volume="$(HOST_PATH_SRC):$(HOST_PATH_DST):rw" \
46 --workdir="$(HOST_PATH_DST)" \
47 -e HOST_PATH_SRC="$(HOST_PATH_SRC)" \
48 -e HOST_PATH_DST="$(HOST_PATH_DST)" \
49 --volume="/var/run/docker.sock:/var/run/docker.sock:rw" \
50 $(PARENT_TAG)
51
52 # Launch child container.
53 .PHONY: run_child_alt
54 run_child_alt:
55 docker run \
56 --rm -it \
57 --volume="$(HOST_PATH_SRC):$(HOST_PATH_DST):rw" \
58 --workdir="$(HOST_PATH_DST)" \
59 -e HOST_PATH_SRC="$(HOST_PATH_SRC)" \
60 -e HOST_PATH_DST="$(HOST_PATH_DST)" \
61 --workdir="/work" \
62 --volume="/var/run/docker.sock:/var/run/docker.sock:rw" \
63 $(CHILD_TAG)
64
65 # Build our C app.
66 .PHONY: app
67 app: helloworld_app
68 helloworld_app:
69 gcc helloworld.c -o $@
Now let’s try this again:
1 # Launch the parent container with our new Makefile (need to specify Makefile
2 # name and rule, since we made a new Makefile to hold our changes).
3 make -f Makefile.sibling_container_exports run_parent_alt
4 docker run \
5 --rm -it \
6 --volume="/home/owner/work:/work:rw" \
7 --workdir="/work" \
8 -e HOST_PATH_SRC="/home/owner/work" \
9 -e HOST_PATH_DST="/work" \
10 --volume="/var/run/docker.sock:/var/run/docker.sock:rw" \
11 dind_example_parent:local
12
13 # Files are visible from parent container.
14 root@fc4380b8bc06:/work# ls
15 Dockerfile Dockerfile.dind_example.child.dockerignore Dockerfile.dind_example.parent.dockerignore Makefile.sibling_container_exports iax.sh
16 Dockerfile.dind_example.child Dockerfile.dind_example.parent Makefile helloworld.c
17
18 # Verify environment variables were passed to parent container (it needs to
19 # pass them along to the child container).
20 root@fc4380b8bc06:/work# export | grep HOST_PATH
21 declare -x HOST_PATH_DST="/work"
22 declare -x HOST_PATH_SRC="/home/owner/work"
23
24 # Looking good so far. Now let's launch the child container.
25 root@fc4380b8bc06:/work# make -f Makefile.sibling_container_exports run_child_alt
26 docker run \
27 --rm -it \
28 --volume="/home/owner/work:/work:rw" \
29 --workdir="/work" \
30 -e HOST_PATH_SRC="/home/owner/work" \
31 -e HOST_PATH_DST="/work" \
32 --workdir="/work" \
33 --volume="/var/run/docker.sock:/var/run/docker.sock:rw" \
34 dind_example_child:local
35
36 # Can we see our files in the child container?
37 root@a841398f3d24:/work# ls
38 Dockerfile Dockerfile.dind_example.child.dockerignore Dockerfile.dind_example.parent.dockerignore Makefile.sibling_container_exports iax.sh
39 Dockerfile.dind_example.child Dockerfile.dind_example.parent Makefile helloworld.c
40
41 # YES!!! Now, can our child container compile our application (the whole
42 # point of having the child container: a dedicated container to build a
43 # specific app via our top-level Makefile).
44 root@a841398f3d24:/work# make -f Makefile.sibling_container_exports app
45 gcc helloworld.c -o helloworld_app
46
47 # Beautiful! All done! Exit child container.
48 root@a841398f3d24:/work# exit
49 exit
50
51 # Exit parent container.
52 root@fc4380b8bc06:/work# exit
53 exit
Excellent! We are able to have a top-level container launch child containers
on-demand to carry out various stages of the build. Furthermore, we could make
additional modifications to a top-level launcher script (e.g. iax.sh) so
that it can bootstrap the entire build from a parent-level container via
something like ./iax.sh make run_parent, which can then trigger the various
intermediate build steps.
Before we conclude this section, there’s one last edge-case I’d like to visit
(which turns out to be rather common): what if we can’t 100% control the
parent-level container (i.e. have it export the HOST_PATH_SRC and
HOST_PATH_DST environment variables to the child container)? This can
happen in cases where using build systems as part of a CI/CD pipeline
that have the runners/builders (i.e. hosts, physical or virtual) execute build
jobs from a container [24] [25]. If this is the case,
we’ll have problems with CI/CD builds, as we’ll once again have the
problem where the child container doesn’t have the necessary information
required for it to properly access the host OS file mount. What is one
to do?
It turns out there is a means (albeit, somewhat “hacky’ish”) that allows a
container to query information on other running containers, if we allow our
“parent” container to access /var/lib/docker.sock (hence the previous
warnings that allowing containers access to this grant them elevated control of
the host system). Before proceeding, let’s establish some (loose) terminology.
“Launcher container”: the true “parent container”. It’s the top-level container that a CI/CD system uses to launch a build job.
“Bootstrap container”: our own “parent container” (i.e. Ubuntu 20.04) that we’ve been working with so far. Since it’s not being used to the launch the build job, it’s technically a “child container” (and the “child container” is actually a “grandchild” container). The “Launcher container” is responsible solely for invoking the “bootstrap container”, which is then responsible for handling the rest of the build.
“Builder container”: our own “child container” (i.e. Debian 10 “Buster”) that we’ve been using so far (is actually a “grandchild container” due to multiple levels of parent containers).
Now, let’s assume that the launcher container invokes the bootstrap container
via something like docker run ... make run_child, and that the Docker socket on
any system is always /var/run/docker.sock, and that it is being mounted
in the launcher container via
--volume=/var/run/docker.sock:/var/run/docker.sock (i.e. while tools like
iax.sh are useful for local builds, CI/CD systems will never use
them, and prefer their own methods/scripts for bootstrapping builds).
With these assumptions in place, we should be able to, using some Docker
commands (i.e. docker inspect) execute various queries within the context
of the bootstrap container, and then pass them along to child (i.e. “builder”)
containers at run time. This should let us, within the bootstrap container,
dynamically determine the equivalent of HOST_PATH_SRC and
HOST_PATH_DST. First, let’s review our modified Makefile, and our
introspection helper script.
1 # Defaults and global settings.
2 .DEFAULT_GOAL: all
3 PARENT_TAG=dind_example_parent:local
4 CHILD_TAG=dind_example_child:local
5
6 # For mounting paths in parent and child containers.
7 # Only set HOST_SRC_PATH if it's not already set. We expect the
8 # invocation/launch of the parent container to "see" this value as un-set,
9 # while the child container should already see it set via "docker run ... -e
10 # ...".
11 ifeq ($(HOST_PATH_SRC),)
12 HOST_PATH_SRC:=$(shell readlink -f .)
13 endif
14 HOST_PATH_DST:=/work
15
16 # Psuedo-random path to PWD. Build systems often use tools like `mktmp` to
17 # create throwaway intermediate build paths for jobs.
18 HOST_PATH_SRC_RANDOM:=$(HOST_PATH_SRC)_$(shell shuf -i 1000000-9999999 -n 1)
19
20 # Default goal (no longer builds C app, but can via manually running
21 # "make app").
22 .PHONY: all
23 all: docker_parent docker_child
24 @echo "Done build."
25
26 # Launcher image (our "parent" image from earlier examples). We'll also use it
27 # as our bootstrap image.
28 .PHONY: docker_parent
29 docker_parent: Dockerfile.dind_example.parent Dockerfile.dind_example.parent.dockerignore
30 DOCKER_BUILDKIT=1 docker build \
31 -t "$(PARENT_TAG)" \
32 --target baseline \
33 -f Dockerfile.dind_example.parent \
34 .
35
36
37 # Builder image (our "child" image from earlier examples).
38 .PHONY: docker_child
39 docker_child: Dockerfile.dind_example.child Dockerfile.dind_example.child.dockerignore
40 DOCKER_BUILDKIT=1 docker build \
41 -t "$(CHILD_TAG)" \
42 --target baseline \
43 -f Dockerfile.dind_example.child \
44 .
45
46 # Launch "launcher" container.
47 .PHONY: run_launcher
48 run_launcher:
49 # Create pseudo-random path to emulate behavior of CI/CD systems.
50 # For educational purposes only.
51 # DON'T USE SUDO IN YOUR BUILD SCRIPTS!!!
52 mkdir -p $(HOST_PATH_SRC_RANDOM)
53 sudo mount --bind $(HOST_PATH_SRC) $(HOST_PATH_SRC_RANDOM)
54 @echo "RANDOM PATH: $(HOST_PATH_SRC_RANDOM)"
55
56 docker run \
57 --rm -it \
58 --volume="$(HOST_PATH_SRC_RANDOM):$(HOST_PATH_DST):rw" \
59 --workdir="$(HOST_PATH_DST)" \
60 -e HOST_PATH_SRC="$(HOST_PATH_SRC)" \
61 -e HOST_PATH_DST="$(HOST_PATH_DST)" \
62 --volume="/var/run/docker.sock:/var/run/docker.sock:rw" \
63 $(PARENT_TAG) \
64 docker run \
65 --rm -it \
66 --volume="$(HOST_PATH_SRC_RANDOM):$(HOST_PATH_DST):rw" \
67 --workdir="$(HOST_PATH_DST)" \
68 --volume="/var/run/docker.sock:/var/run/docker.sock:rw" \
69 $(PARENT_TAG)
70
71 # Clean up.
72 sudo umount $(HOST_PATH_SRC_RANDOM)
73
74 # Build our C app.
75 .PHONY: app
76 app: helloworld_app
77 helloworld_app:
78 gcc helloworld.c -o $@
1 #!/bin/bash
2
3 # Needs an argument.
4 if [ -z "${1}" ]; then
5 exit 1
6 fi
7
8 # Get the name of the image for the currently running container.
9 SELF_IMAGE_NAME=$(basename "$(head /proc/1/cgroup)")
10
11 # Might need to strip out some extra info depending how old your Docker
12 # installation is.
13 SELF_IMAGE_NAME=$(echo ${SELF_IMAGE_NAME} | sed "s/^docker-//g" | sed "s/\.scope$//g")
14
15 # Search mounts associated with currently running container. Return a match if
16 # found.
17 docker inspect --format '{{json .Mounts }}' "${SELF_IMAGE_NAME}" | jq -c '.[]' | while read key ; do
18 src=$(echo ${key} | jq -r .Source)
19 dst=$(echo ${key} | jq -r .Destination)
20 echo "SRC:${src} DST:${dst}" >&2
21 if [[ "${1}" == "${dst}" ]]; then
22 echo "${src}"
23 exit 0
24 fi
25 done
Now, let’s launch our launcher container (e.g. represents something similar to a GitLab or Jenkins “runner” image), and then launch our bootstrap container (effectively the “parent” container we’ve been working with throughout this section), and see what useful information we can glean.
1 owner@darkstar$> make -f Makefile.introspection run_launcher
2 # Create pseudo-random path to emulate behavior of CI/CD systems.
3 # For educational purposes only.
4 # DON'T USE SUDO IN YOUR BUILD SCRIPTS!!!
5 mkdir -p /home/owner/work_2338367
6 sudo mount --bind /home/owner/work /home/owner/work_2338367
7 RANDOM PATH: /home/owner/work_2338367
8 docker run \
9 --rm -it \
10 --volume="/home/owner/work_2338367:/work:rw" \
11 --workdir="/work" \
12 -e HOST_PATH_SRC="/home/owner/work" \
13 -e HOST_PATH_DST="/work" \
14 --volume="/var/run/docker.sock:/var/run/docker.sock:rw" \
15 dind_example_parent:local \
16 docker run \
17 --rm -it \
18 --volume="/home/owner/work_2338367:/work:rw" \
19 --workdir="/work" \
20 --volume="/var/run/docker.sock:/var/run/docker.sock:rw" \
21 dind_example_parent:local
22
23 # Launched 2 levels of Docker, now in the "bootstrap" container.
24 root@094da58d8a64:/work# ls
25 Dockerfile Dockerfile.dind_example.child.dockerignore Dockerfile.dind_example.parent.dockerignore Makefile.introspection docker_mount_resolver.sh helloworld_app
26 Dockerfile.dind_example.child Dockerfile.dind_example.parent Makefile Makefile.sibling_container_exports helloworld.c iax.sh
27
28 # Make sure no env vars to "cheat" with.
29 root@094da58d8a64:/work# export | grep HOST_PATH
30
31 # Try to find a Docker mount in the parent container matching "blah" (we know
32 # this will fail, just running the script to see what kind of results we're
33 # searching through).
34 root@094da58d8a64:/work# ./docker_mount_resolver.sh blah
35 SRC:/home/owner/work_2338367 DST:/work
36 SRC:/var/run/docker.sock DST:/var/run/docker.sock
37
38 # Done.
39 root@094da58d8a64:/work# exit
40 # Clean up.
41 sudo umount /home/owner/code/repos/iaxes/pronk8s-src/examples/build_patterns/dind_example_2338367
So we can see that through the use of a tool like our
docker_mount_resolver.sh script we can see the mounts used by the parent of
our bootstrap container (i.e. the launcher container), and we could make an
educated guess as to which of the results yields the pair of strings we’d pass
to a child container if we wanted it to be able to access files from the host
OS (hint: in the above example, it’s
SRC:/home/owner/work_2338367 DST:/work). However, the key point to keep in
mind is that it’s still a guess. Unless your CI/CD system exports
some environment variables or provides some means of querying/exporting these
values at run time, you’ll have to use some sort of run-time introspection to
fully leverage nested containers in your own CI/CD pipelines. This can
be further compounded with minor discrepancies between runners (i.e. hosts that
execute builds for the pipeline), such as a difference in path names or path
patterns on in-house versus AWS instances of runners. Also, you’ll need
to get the necessary approvals from your ITS department due to the
security implications of sharing the Docker socket, and so on. So, it’s worth
noting that as useful and flexible nested Docker/container builds are, they are
not without their caveats, and you may end up finding it easier (in terms of
not using introspection scripts, getting approval from ITS on how
you’ll implement your CI/CD pipelines, etc.) to use multi-container
builds rather than nested container builds.
Note
Build pattern viability metrics.
Repeatable: moderately repeatable. DevOps team members will likely have to debug numerous corner-cases that arise due to differences in CI/CD builds versus local/developer builds.
Reliable: very reliable, provided the host OS itself is stable.
Maintainable: yes, but additional testing/debugging by developers and DevOps to “get it right initially” (i.e. working out quirks in build infrastructure for CI/CD builds versus local/developer builds). More complex to maintain as developers responsible for maintaining the build scripts will need to be sufficiently versed in Linux and Docker.
Scalable: extremely scalable.
Advanced Example: Single Container with Docker
This section focuses exclusively on an advanced version of the iax.sh
launcher script covered in Single Container with Docker, with emphasis on
day-to-day “real world” scenarios where one would use a Docker container for
building projects from source locally (and has no relevance to CI/CD
build infrastructure). Therefore, the following section is only recommended for
those that will be building (or supporting builds) of source trees on local
development environments (e.g. workstations/laptops for individual
contributors).
Now, with that said, let’s just demonstrate our “improved” launcher script, and then we’ll go through the various options, line-by-line, and explain their significance (with “real-world” examples) as we go along.
1 #!/bin/bash
2 ################################################################################
3 # @brief: Docker-bootstrap script for building projects via a Docker
4 # image.
5 # @author: Matthew Giassa.
6 # @e-mail: matthew@giassa.net
7 # @copyright: Matthew Giassa (IAXES) 2017.
8 ################################################################################
9
10 # Docker runtime image to use for building artifacts.
11 DOCKER_IMG="iaxes/iaxes-docker-builder-docs"
12
13 # Need to dynamically create a set of "--group-add" statements while iteration
14 # across all groups for which we are a member, otherwise a simple
15 # "--user=$(id -u):$(id -g)" argument to "docker run" will only capture our
16 # primary group ID, and overlook our secondary group IDs (which means we won't
17 # be a member of the "docker" group when executing nested containers as a
18 # rootless user, causing headaches).
19 MY_GROUPS=("$(groups)")
20 MY_GROUPS_STR=""
21 for grp in ${MY_GROUPS[@]}; do
22 if [[ "${grp}" == "$(whoami)" ]]; then
23 continue
24 else
25 # Need to use GID, not group name.
26 gid="$(echo $(getent group ${grp}) | awk -F ':' '{print $3}')"
27 MY_GROUPS_STR+="--group-add ${gid} "
28 fi
29 done
30
31 # Debug logging.
32 # echo "My groups: ${MY_GROUPS[@]}" >&2
33 # echo "Group string: ${MY_GROUPS_STR}" >&2
34
35 # Launch docker container.
36 # * Setup PWD on host to mount to "/work" in the guest/container.
37 # * Forward access to SSH agent and host credentials (so container uses same
38 # user/group permissions as current user that launches the script).
39 # * Make DIND possible (i.e. expose host Docker Unix domain socket to
40 # guest/container).
41 # * Make the home directory be "/work" so that it's always writeable (allows us
42 # to better handle rootless DIND and KIND).
43 # * Use host networking (non-ideal, but necessary for top-level containers to
44 # access certain services like KIND-exposed kubeadm ports redirecting to port
45 # 6443 inside a pod without requiring a bridge being setup in advance).
46 docker run \
47 --rm -it \
48 --user="$(id -u):$(id -g)" \
49 ${MY_GROUPS_STR} \
50 --volume="/etc/passwd:/etc/passwd:ro" \
51 --volume="/etc/group:/etc/group:ro" \
52 --volume="$(readlink -f .):/work:rw" \
53 --workdir="/work" \
54 --volume="$(readlink -f ~/.ssh):$(readlink -f ~/.ssh):ro" \
55 --volume="$(dirname ${SSH_AUTH_SOCK}):$(dirname ${SSH_AUTH_SOCK})" \
56 -e SSH_AUTH_SOCK=${SSH_AUTH_SOCK} \
57 --volume="/var/run/docker.sock:/var/run/docker.sock:rw" \
58 -e HOME="/work" \
59 --network=host \
60 ${DOCKER_IMG} \
61 ${@}
Before proceeding, it is worth noting that, for certain types of work, I will
use a command-line SSH agent to cache credentials. This is so that I
don’t find myself repeatedly having to type in passphrases every single time I
execute a git or ssh command. A common way to do this, assuming one has
a ~/.ssh/id_rsa private key and ~/.ssh/id_rsa.pub public key, for
example, is like so:
1 eval `ssh-agent`
2 ssh-add ~/.ssh/id_rsa
After running this, subsequent commands will inherit the relevant environment
variables the above-noted commands generate (i.e. SSH_AGENT_PID,
SSH_AUTH_SOCK), so you could launch an instance of tmux [26]
for example, and all panes/windows/etc. created within it would have access to
this credential cache (helpful for having multiple “tabs” open at once and not
having to manually enter credentials into all of them manually). For example,
in Fig. 6, I have various editors, tools, etc.; running in the
various tmux panes, and I’ve only had to enter my credentials once rather
than 6+ times. When I eventually terminate the tmux instance itself at the
end of my work day, the credential cache is gone, and we can just repeat the
whole process again another day.
Fig. 6 Example of my (console-centric) development environment.
Why is this relevant, you might ask? Well, while the bulk of coding and editing
(in my case) is done on the host OS, the majority of the build
operations take place in containers. These containers, by default, do not have
access to my SSH keys, credentials, etc.; so they cannot interact with
various pieces of build infrastructure to carry out common tasks, such as
checking out code from a git repository, downloading
dependencies/intermediate-build-artifacts from secured repositories, etc. While
in theory, one could duplicate their credentials into a Docker container (i.e.
by modifying the Dockerfile to bundle credentials and keys into the image,
which is a horrible idea, as discussed in further detail in
Best Practises & Security Concerns), there’s a better, and much more temporary way
to accomplish this (without having build artifacts containing credentials
floating around on your workstation, or even worse, shared build infrastructure
in case you accidentally published the image).
Now, on to the specific options we use when launching our builder image.
1 docker run \
2 --rm -it \
3 --volume="$(readlink -f .):/work:rw" \
4 --workdir="/work" \
5 ...
6 ...
7 ...
8 ${DOCKER_IMG} \
9 ${@}
Nothing new here: this is how we’ve been launching builder containers so far
(i.e. attach STDIN, allocate a pseudo-TTY, clean-up when done, mount the
PWD on the host OS to /work inside the running container,
pass along command-line arguments, etc.).
1 docker run \
2 ...
3 ...
4 ...
5 --user="$(id -u):$(id -g)" \
6 --volume="/etc/passwd:/etc/passwd:ro" \
7 --volume="/etc/group:/etc/group:ro" \
8 ...
9 ...
10 ...
11 ${DOCKER_IMG} \
12 ${@}
These commands instruct Docker to run under a specific user and group name
(i.e. that of the current user session running on the host OS). The
volume mounts (set to read-only on purpose so we don’t give the container the
opportunity to accidentally or deliberately corrupt them) supplement the
--user command so we can map user and group names to their appropriate
numerical IDs within the container. Why is this helpful? Well, if
you just docker run a container with a volume mount in place (like in the
various examples found in Single Container with Docker), and create a file
(e.g. touch /work/myfile.txt), you’ll notice the file is owned by the
root user (example below).
Warning
The use of --user="$(id -u):$(id -g)" works in general, but it only
associates the user’s primary group, rather than the union of the primary
group and secondary groups (necessary if we want to do certain types of
complex operations like “rootless docker-in-docker”). Please see the
K8S build pattern section later in this chapter for more details.
1 # Launch our Docker container.
2 owner@darkstar$> $> docker run -it --rm \
3 --volume="$(readlink -f .):/work"
4 --workdir="/work"
5 ubuntu:focal
6
7 # Create a file while in the container.
8 root@8111f7b149c7:/work# touch myfile.txt
9
10 # Exit container, and verify file ownership.
11 root@8111f7b149c7:/work# exit
12 owner@darkstar$> ls -la myfile.txt
13 -rw-r--r-- 1 root 0 Aug 1 12:39 myfile.txt
This is no good! We now have a file owned by root in our PWD that
we can’t delete. If we want to purge our build stage or just change branches in
git, we’re out of luck. We now either require our user account to have
sudo privileges (which is not always possible), or we need an administrator
to purge the file for us (which isn’t very helpful for a workflow we’re aiming
to automate significantly). If we use the --user and volume mounts in the
previous example, all new files created in our volume mount are owned by the
user that launched iax.sh in the first place (allowing for files to be
cleaned up, deleted, etc.) at the user’s discretion. On to the next set of
options.
1 docker run \
2 ...
3 ...
4 ...
5 --volume="/var/run/docker.sock:/var/run/docker.sock:rw" \
6 ...
7 ...
8 ...
9 ${DOCKER_IMG} \
10 ${@}
This is just for allowing functionality like Docker-in-Docker to work. On to the final set of “customizations”. The security implications of this method are discussed earlier in this chapter, and the reader is encouraged to review it in case they’ve skipped said section.
1 docker run \
2 ...
3 ...
4 ...
5 --volume="$(readlink -f ~/.ssh):$(readlink -f ~/.ssh):ro" \
6 --volume="$(dirname ${SSH_AUTH_SOCK}):$(dirname ${SSH_AUTH_SOCK})" \
7 -e SSH_AUTH_SOCK=${SSH_AUTH_SOCK} \
8 ...
9 ...
10 ...
11 ${DOCKER_IMG} \
12 ${@}
This last set of options should only be used in cases where you implicitly
trust the contents of the builder container (i.e. provided to you by a trusted
party and you’ve verified the contents via checksums or digital signatures).
The first volume mount grants read-only access to your SSH key files
(public and private files, and whatever other keys you have present in
~/.ssh; I hope you’re using passphrases to protect these files). The second
volume mount provides access to the currently running ssh-agent instance
that is caching our credentials in the background (while the subsequent
environment variable export allows the container to know where to find the
socket/path associated with the agent).
When we combine these various settings, we can take an ordering builder
container (provided we trust it and can verify its contents), and give it
various capabilities (i.e. make use of our currently running session to
authenticate things like git and ssh commands, launch nested containers
via Docker-in-Docker, make sure build artifacts have the same ownership as the
user that invoked the container, etc.). Most importantly, all these settings
are ephemeral, are provided entirely by additional command-line arguments
supplied to docker run, and at no time have we taken credential files or
sensitive information and “baked it in” to a concrete Docker image.
Cluster Orchestration with Kubernetes (K8S)
This section extends the topics in the preceding sections by throwing in a useful technology to the mix: K8S. This is accomplished by using container-centric build patterns, and introducing tools to create on-demand, throwaway clusters, and deploying applications into them on-the-fly. This is particularly useful for emulating complex build (i.e. CI/CD) systems that operate within a cluster, and we don’t want to have to provision a dedicated centralized cluster for developers.
In fact, if individual developers have sufficient computing resources at their disposal (i.e. powerful-enough laptops/workstations/etc.), this is quite convenient, as individuals may test their code changes against a private, throwaway cluster, rather than having to share a common cluster that others may be using at the same time (requiring isolation between different deployments, possibly reserving the cluster outright if potentially-destructive testing needs to be done, etc.).
These topics will be revisited in future sections when we address topics
involving automated testing (Testing Strategies). Finally, it is worth noting
that in this chapter so far, various scripts have accumulated in
/home/owner/work on the host OS (i.e. Dockerfiles, Makefiles,
various build scripts) that were used in examples so far. From this point
forward, we’re going to purge the contents of this path and start with a fresh
slate (i.e. an empty/clean /home/owner/work path).
Kubernetes in Docker (KIND)
Perhaps the most extreme example of a cloud native build pattern, the use of “Kubernetes in Docker” (KIND) makes extensive use of containers, as well as container orchestration in the form of K8S itself. In short, it literally invokes a Docker container, and configures a K8S cluster within it, which is amusing due to the fact that the cluster itself, which handles “cluster orchestration”, which is effectively a grouping of various types of containers (some to manage or support normal cluster operations, and others which are just applications that we design ourselves). The net result is a container, running a cluster, than runs more containers (“containers in a cluster in a container”, Fig. 7).
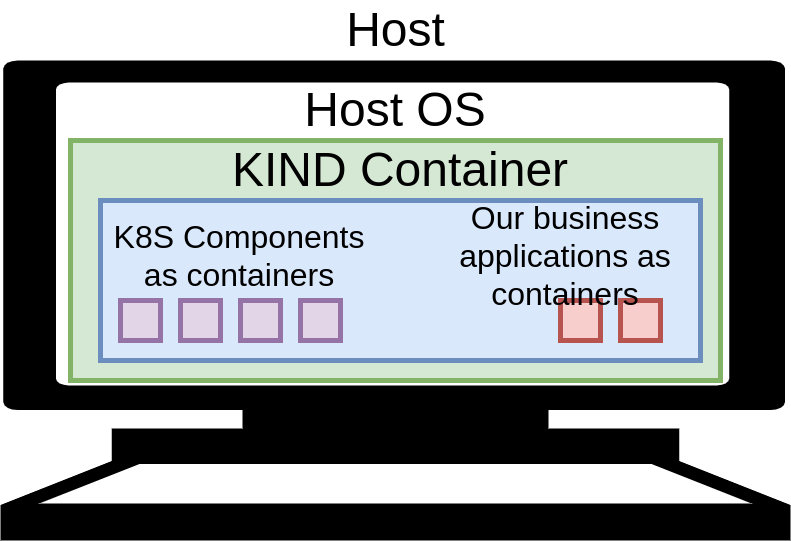
Fig. 7 Conceptual model of Kubernetes-in-Docker. Recall from earlier that nested containers, including use cases like KIND, are really “sibling containers”.
With respect to Fig. 7, we’re hiding some implementation details,
namely the critical components for a K8S installation (i.e. etcd,
kube-apiserver, kube-scheduler, and controller-manager for the
control plane; and kubelet, kube-proxy, and a container runtime such as
docker for the nodes/workers [27]). A detailed example of these
components can be seen in Fig. 8. For the sake of simplicity,
the small purple boxes in Fig. 7 more-or-less equate to the
architecture shown in Fig. 8, which the small red boxes
represent “business applications” (i.e. programs that we write ourselves,
encapsulate in Docker containers, and deploy to a K8S cluster).
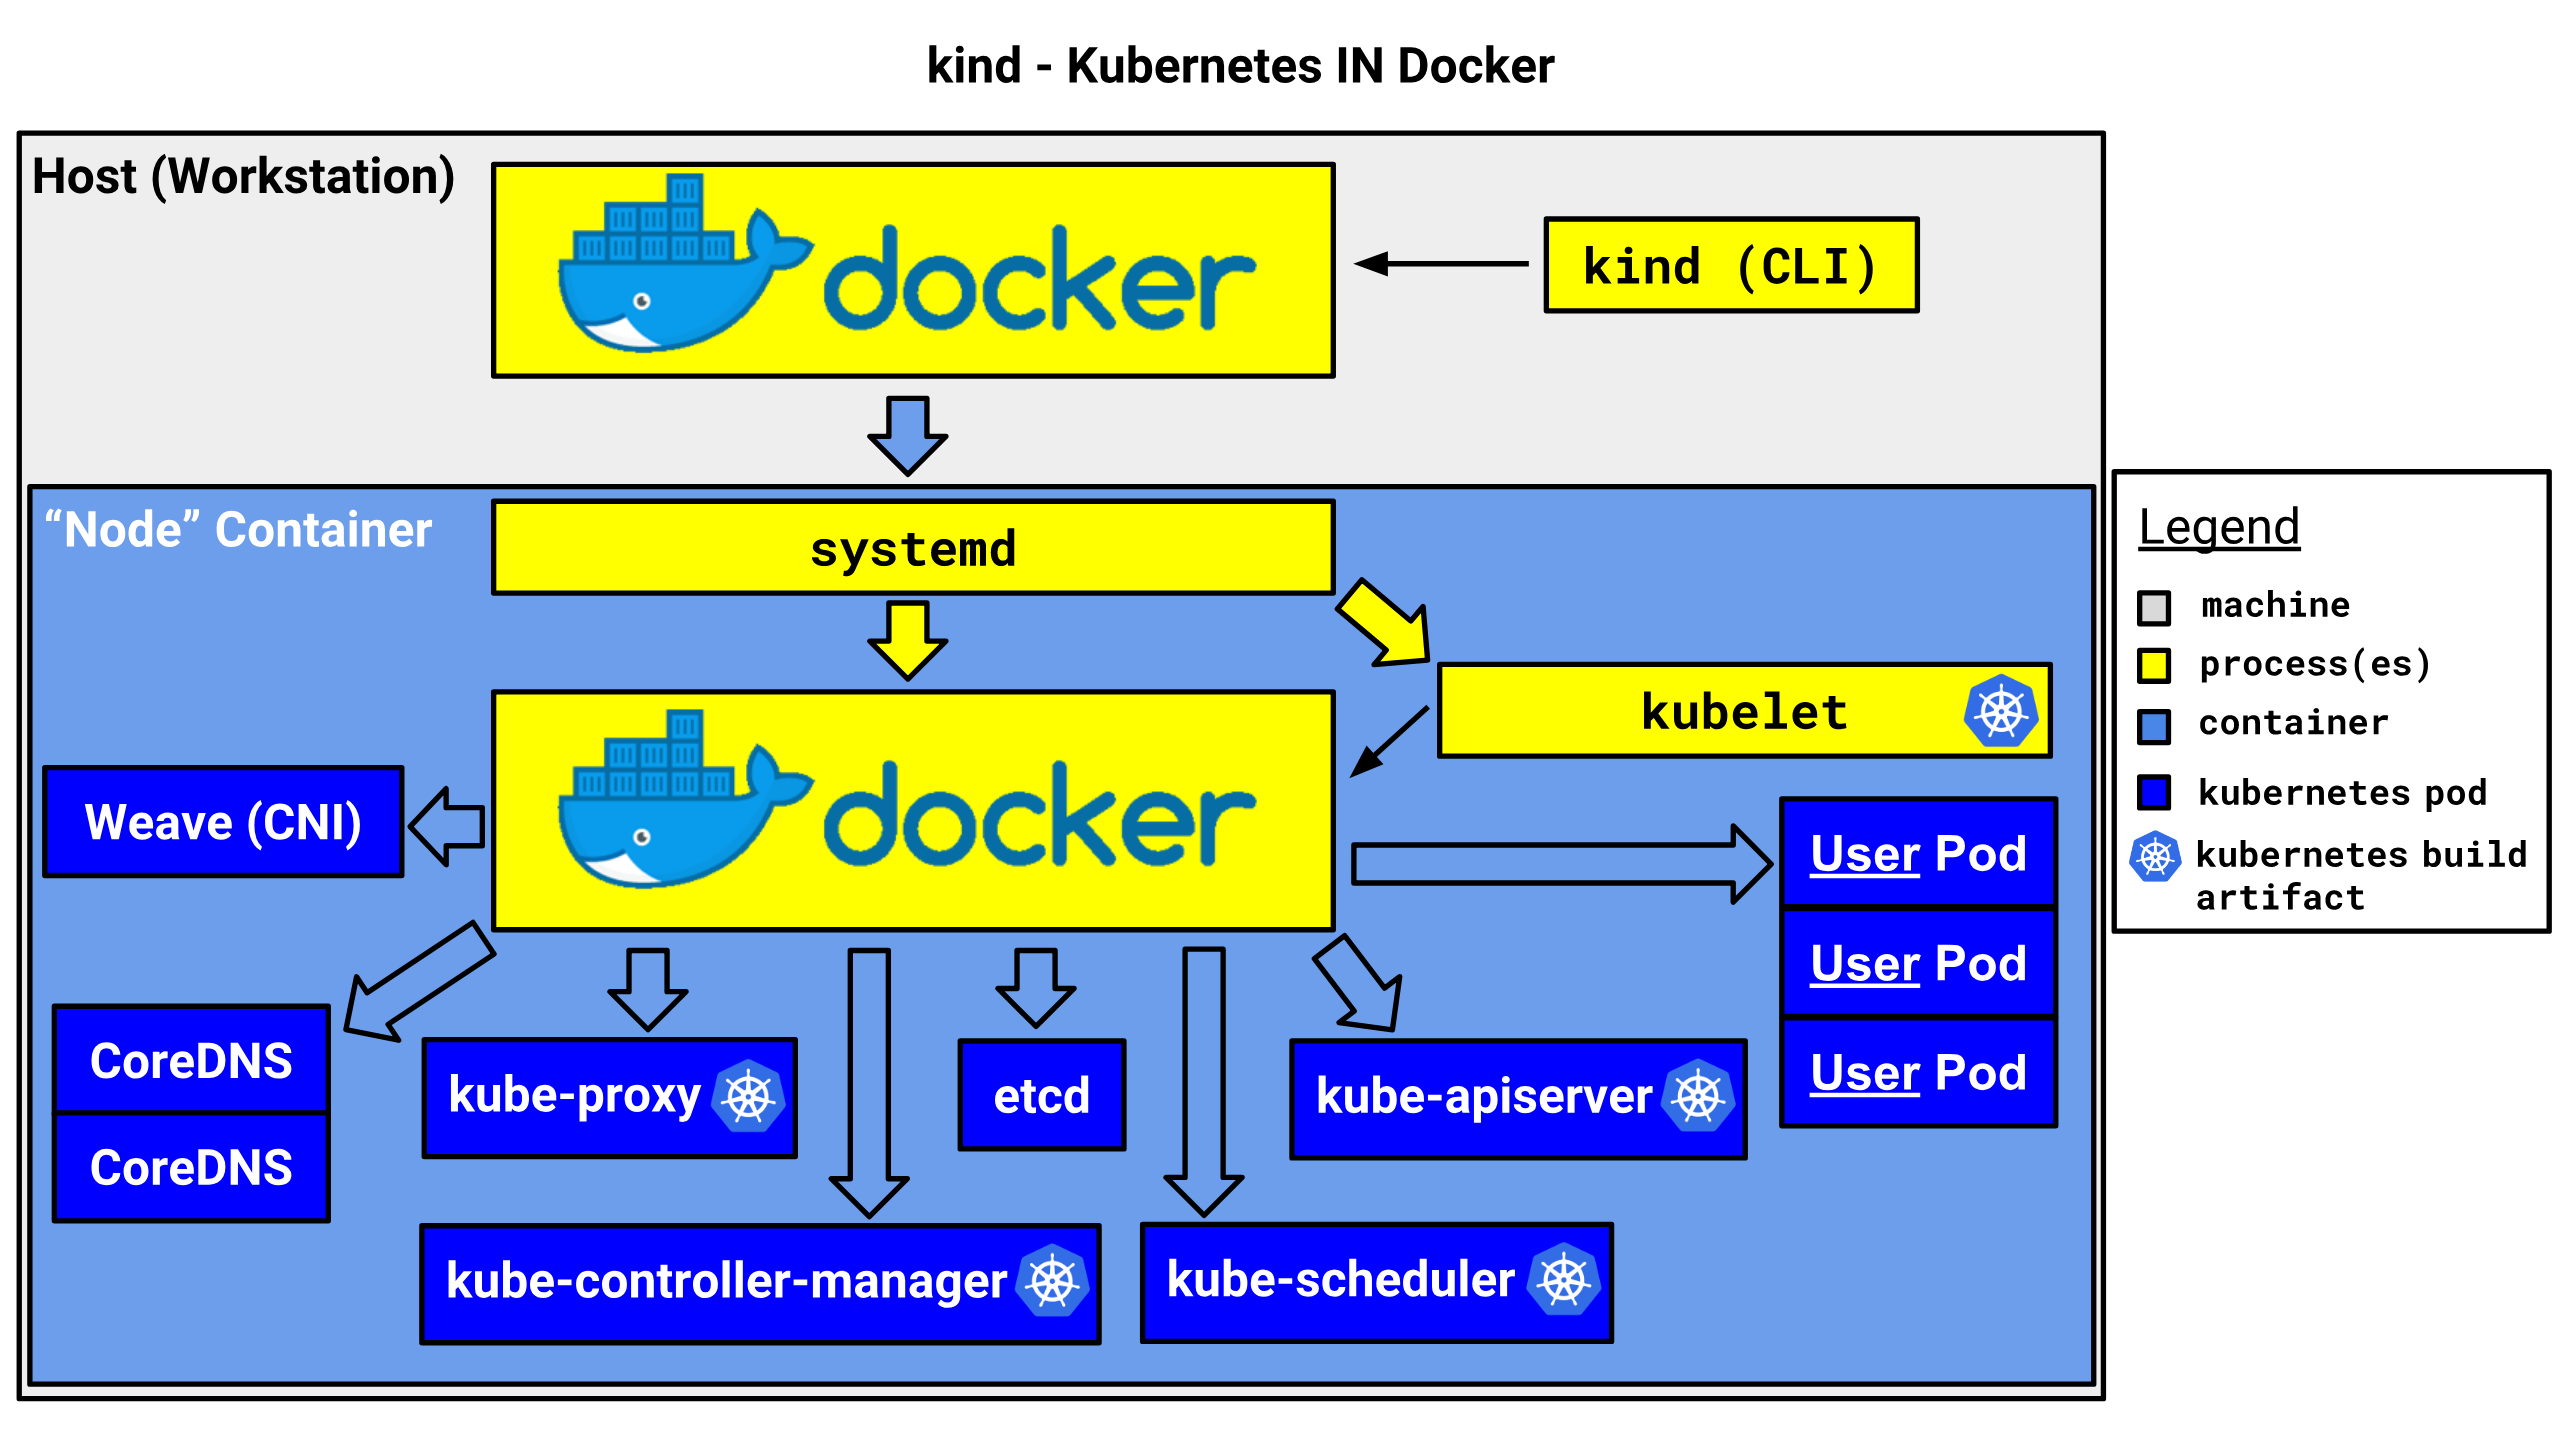
Fig. 8 Overview of core K8S components in KIND. (C) 2021 the KIND Authors. Used under the fair dealings clause under section 29 of the Copyright Act of Canada, circa 2012; for the purposes of non-profit scientific research and the promotion of scientific and educational advancement.
Before proceeding, we’re going to make this example just a bit more involved:
we’re going to throw more, believe it or not, Docker at the problem. For
starters, I’d like this example to be as portable as possible, and in order to
proceed, we’ll need some additional tools (namely kubectl, for
administering a K8S cluster), so I’d like to encapsulate the
KIND container in a top-level “builder container”, which will “house”
the KIND Docker container and its own child processes (“containers in a
cluster in a container in yet another container”).
While this might appear to border on the absurd, it’s a helpful way to make the overall project easier to share with colleagues, and allows it to be a more viable build pattern (i.e. allowing local/developer build environments and CI/CD pipelines to differ as little as possible). The “builder container” will also house some additional child containers for validating our application (i.e. test suites), and the “KIND container” for actually running the final result in a cluster. Our overall model will look something like Fig. 9. In the future (i.e. Testing Strategies) we can extend this even further to include additional testing containers as children of the “builder container” to do automated unit testing, among other tasks.
Warning
At this time, the “app testing container” will be created, but not used. This will be revisited in Testing Strategies. For now, any (basic) testing we do will be processes that reside in the “builder container” communicating with the “business app” running within the KIND container.
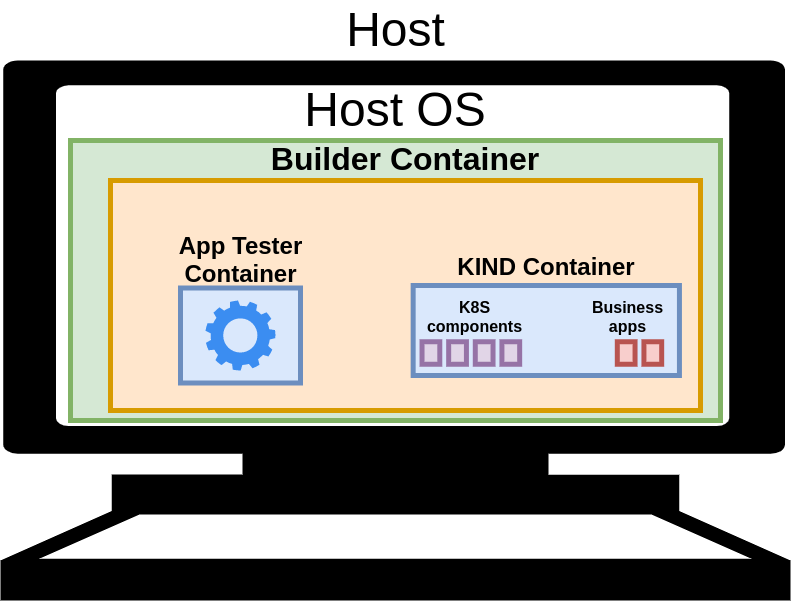
Fig. 9 Conceptual model of a Docker-in-Docker configuration that encapsulates a build system, and KIND-based system for temporary/ephemeral cluster generation.
Now, let’s get started. First, we need to create the image for the builder container, and the various containers it encapsulates. To maximize the portability of this overall process, we’re going to “bootstrap a builder image”. This is effectively building a Docker image (that includes, at a minimum, a copy of Docker itself along with some build tools) which we build from either a bare metal or VM-based host OS. When the image is built, it is now capable of building new releases of itself from the same build scripts we originally used on the original host that built it in the first place. Why go to such hassle?
Well, we can create a self-sustaining build environment that’s completely containerized (after the initial bootstrapping phase), and re-use this builder image to produce the other various containers in our final product (i.e. it can build the “app tester container”, etc.) in addition to new versions/releases of the builder image itself. In the end, all of our infrastructure, including the build-time and runtime images, are completely encapsulated in containerization technology, increasing overall scalability and re-usability significantly. Now, let’s get the scripts in order for the initial “bare metal build” of our “pre-bootstrap builder image”.
1 FROM ubuntu:focal as baseline
2
3 # System packages.
4 RUN apt update -y && \
5 apt install -y \
6 binutils \
7 build-essential \
8 coreutils \
9 curl \
10 docker.io \
11 gcc \
12 git \
13 iproute2 \
14 iputils-ping \
15 jq \
16 lsb-release \
17 make \
18 net-tools\
19 python3 \
20 python3-dev \
21 python3-pip \
22 uuid-runtime \
23 vim \
24 wget \
25 && \
26 apt clean -y
1 # Ignore everything by default. We can manually add individual files as we
2 # need them to this permit-list.
3 *
1 # Defaults and global settings.
2 .DEFAULT_GOAL: all
3 BUILDER_TAG=docker_builder:0.0.0
4
5 # Default goal.
6 .PHONY: all
7 all: docker_builder
8 @echo "Done build."
9
10 # Build Docker image.
11 .PHONY: docker_builder
12 docker_builder: Dockerfile.bootstrap_builder.pre Dockerfile.bootstrap_builder.pre.dockerignore
13 DOCKER_BUILDKIT=1 docker build \
14 -t "$(BUILDER_TAG)" \
15 --target baseline \
16 -f Dockerfile.bootstrap_builder.pre \
17 .
18
19 # Launch Docker container.
20 .PHONY: run_builder
21 run_builder:
22 docker run \
23 --rm -it \
24 --volume="$(shell readlink -f .):/work:rw" \
25 --workdir="/work" \
26 --volume="/var/run/docker.sock:/var/run/docker.sock:rw" \
27 $(BUILDER_TAG)
Now let’s trigger the build of our “pre-bootstrap builder image”.
1 # Build the image.
2 owner@darkstar$> make -f Makefile.bootstrap_builder.pre
3 DOCKER_BUILDKIT=1 docker build \
4 -t "docker_builder:0.0.0" \
5 --target baseline \
6 -f Dockerfile.bootstrap_builder.pre \
7 .
8 [+] Building 40.6s (6/6) FINISHED
9 => => naming to docker.io/library/docker_builder:0.0.0 0.0s
10 Done build.
11
12 # Let's confirm it's properly tagged.
13 owner@darkstar$> docker image ls | grep docker_builder.*'0.0.0'
14 docker_builder 0.0.0 1c407d6c0b93 14 minutes ago 860MB
15
16 # Great.
Now we have a 0.0.0 release of our builder image. Let’s duplicate the
various build scripts (so we can compare the before-and-after), along with the
top-level iax.sh we use to bootstrap the whole process. Note how the
version of the builder image in iax.sh always trails/follows the version in
in Makefile.builder (i.e. 0.0.0 in iax.sh versus 0.0.1 in
Makefile.builder; we’re using an old version of the builder image to create
a newer one, and we’ll need to periodically increment both of these
values).
1 FROM ubuntu:focal as baseline
2
3 # System packages.
4 RUN apt update -y && \
5 apt install -y \
6 binutils \
7 build-essential \
8 coreutils \
9 curl \
10 docker.io \
11 gcc \
12 git \
13 iproute2 \
14 iputils-ping \
15 jq \
16 lsb-release \
17 make \
18 net-tools\
19 python3 \
20 python3-dev \
21 python3-pip \
22 uuid-runtime \
23 vim \
24 wget \
25 && \
26 apt clean -y
27
28 # kubectl - for administering K8S clusters.
29 ADD kubectl /usr/local/bin/
30
31 # helm - for K8S package management.
32 ADD helm /usr/local/bin/
33
34 # kind - for spinning-up throwaway/test K8S clusters on-demand.
35 ADD kind /usr/local/bin/
1 # Ignore everything by default. We can manually add individual files as we
2 # need them to this permit-list.
3 *
4
5 # Build artifacts we want in the final image.
6 !kubectl
7 !helm
8 !kind
1 # Default shell (need bash instead of sh for some inline scripts).
2 SHELL := /bin/bash
3
4 # Defaults and global settings.
5 .DEFAULT_GOAL: all
6 BUILDER_TAG=docker_builder:0.0.1
7
8 # Default goal.
9 .PHONY: all
10 all: docker_builder
11 @echo "Done build."
12
13 # Build Docker image.
14 .PHONY: docker_builder
15 docker_builder: Dockerfile.builder Dockerfile.builder.dockerignore kubectl kind helm
16 DOCKER_BUILDKIT=1 docker build \
17 -t "$(BUILDER_TAG)" \
18 --target baseline \
19 -f Dockerfile.builder \
20 .
21
22 # Download and verify kubectl binary.
23 kubectl:
24 # Purge old copy if it exists from previous (failed) run.
25 rm -f ./kubectl
26
27 # Pull file.
28 curl -o $(@) -L https://dl.k8s.io/release/v1.21.0/bin/linux/amd64/kubectl
29
30 # Validate checksum. Terminate build if it fails.
31 EXPECTED_CHECKSUM="9f74f2fa7ee32ad07e17211725992248470310ca1988214518806b39b1dad9f0"; \
32 CALCULATED_CHECKSUM=$$(sha256sum $(@) | cut -d ' ' -f1); \
33 echo "Sums: $${EXPECTED_CHECKSUM} --> $${CALCULATED_CHECKSUM}"; \
34 if [[ $${EXPECTED_CHECKSUM} == $${CALCULATED_CHECKSUM} ]]; then \
35 echo "Checksum matches."; \
36 true; \
37 else \
38 echo "Checksum failure."; \
39 false; \
40 fi ;
41 chmod +x $(@)
42
43 # Download and verify kind binary.
44 kind:
45 # Purge old copy if it exists from previous (failed) run.
46 rm -f ./kind
47
48 # Pull file.
49 curl -o $(@) -L https://github.com/kubernetes-sigs/kind/releases/download/v0.11.1/kind-linux-amd64
50
51 # Validate checksum. Terminate build if it fails.
52 EXPECTED_CHECKSUM="949f81b3c30ca03a3d4effdecda04f100fa3edc07a28b19400f72ede7c5f0491"; \
53 CALCULATED_CHECKSUM=$$(sha256sum $(@) | cut -d ' ' -f1); \
54 echo "Sums: $${EXPECTED_CHECKSUM} --> $${CALCULATED_CHECKSUM}"; \
55 if [[ $${EXPECTED_CHECKSUM} == $${CALCULATED_CHECKSUM} ]]; then \
56 echo "Checksum matches."; \
57 true; \
58 else \
59 echo "Checksum failure."; \
60 false; \
61 fi ;
62 chmod +x $(@)
63
64 # Download and verify helm binary.
65 helm:
66 # Purge old copy if it exists from previous (failed) run.
67 rm -f ./helm
68 rm -f ./helm.tar.gz
69 rm -rf "./linux-amd64"
70
71 # Pull file.
72 curl -o helm.tar.gz -L https://get.helm.sh/helm-v3.6.3-linux-amd64.tar.gz > helm.tar.gz
73
74 # Validate checksum. Terminate build if it fails.
75 EXPECTED_CHECKSUM="07c100849925623dc1913209cd1a30f0a9b80a5b4d6ff2153c609d11b043e262"; \
76 CALCULATED_CHECKSUM=$$(sha256sum helm.tar.gz | cut -d ' ' -f1); \
77 echo "Sums: $${EXPECTED_CHECKSUM} --> $${CALCULATED_CHECKSUM}"; \
78 if [[ $${EXPECTED_CHECKSUM} == $${CALCULATED_CHECKSUM} ]]; then \
79 echo "Checksum matches."; \
80 true; \
81 else \
82 echo "Checksum failure."; \
83 false; \
84 fi ;
85
86 # If the job hasn't failed at this point, checksum is good. Extract the
87 # binary and delete the original archive.
88 tar -zxvf helm.tar.gz
89 mv ./linux-amd64/helm .
90 chmod +x $(@)
91 rm -f ./helm.tar.gz
92 rm -rf "./linux-amd64"
93
94 # Launch Docker container.
95 .PHONY: run_builder
96 run_builder:
97 docker run \
98 --rm -it \
99 --volume="$(shell readlink -f .):/work:rw" \
100 --workdir="/work" \
101 --volume="/var/run/docker.sock:/var/run/docker.sock:rw" \
102 $(BUILDER_TAG)
1 #!/bin/bash
2 ################################################################################
3 # @brief: Docker-bootstrap script for building projects via a Docker
4 # image.
5 # @author: Matthew Giassa.
6 # @e-mail: matthew@giassa.net
7 # @copyright: Matthew Giassa (IAXES) 2017.
8 ################################################################################
9
10 # Docker runtime image to use for building artifacts.
11 DOCKER_IMG="docker_builder:0.0.0"
12
13 # Need to dynamically create a set of "--group-add" statements while iteration
14 # across all groups for which we are a member, otherwise a simple
15 # "--user=$(id -u):$(id -g)" argument to "docker run" will only capture our
16 # primary group ID, and overlook our secondary group IDs (which means we won't
17 # be a member of the "docker" group when executing nested containers as a
18 # rootless user, causing headaches).
19 MY_GROUPS=("$(groups)")
20 MY_GROUPS_STR=""
21 for grp in ${MY_GROUPS[@]}; do
22 if [[ "${grp}" == "$(whoami)" ]]; then
23 continue
24 else
25 # Need to use GID, not group name.
26 gid="$(echo $(getent group ${grp}) | awk -F ':' '{print $3}')"
27 MY_GROUPS_STR+="--group-add ${gid} "
28 fi
29 done
30
31 # Debug logging.
32 # echo "My groups: ${MY_GROUPS[@]}" >&2
33 # echo "Group string: ${MY_GROUPS_STR}" >&2
34
35 # Launch docker container.
36 # * Setup PWD on host to mount to "/work" in the guest/container.
37 # * Forward access to SSH agent and host credentials (so container uses same
38 # user/group permissions as current user that launches the script).
39 # * Make DIND possible (i.e. expose host Docker Unix domain socket to
40 # guest/container).
41 # * Make the home directory be "/work" so that it's always writeable (allows us
42 # to better handle rootless DIND and KIND).
43 # * Use host networking (non-ideal, but necessary for top-level containers to
44 # access certain services like KIND-exposed kubeadm ports redirecting to port
45 # 6443 inside a pod without requiring a bridge being setup in advance).
46 docker run \
47 --rm -it \
48 --user="$(id -u):$(id -g)" \
49 ${MY_GROUPS_STR} \
50 --volume="/etc/passwd:/etc/passwd:ro" \
51 --volume="/etc/group:/etc/group:ro" \
52 --volume="$(readlink -f .):/work:rw" \
53 --workdir="/work" \
54 --volume="$(readlink -f ~/.ssh):$(readlink -f ~/.ssh):ro" \
55 --volume="$(dirname ${SSH_AUTH_SOCK}):$(dirname ${SSH_AUTH_SOCK})" \
56 -e SSH_AUTH_SOCK=${SSH_AUTH_SOCK} \
57 --volume="/var/run/docker.sock:/var/run/docker.sock:rw" \
58 -e HOME="/work" \
59 --network=host \
60 ${DOCKER_IMG} \
61 ${@}
1 # Start the build.
2 owner@darkstar$> ./iax.sh make -f Makefile.builder
3 DOCKER_BUILDKIT=1 docker build \
4 -t "docker_builder:0.0.1" \
5 --target baseline \
6 -f Dockerfile.builder \
7 .
8 [+] Building 0.0s (6/6) FINISHED
9 ...
10 ...
11 ...
12 Done build.
13
14 # Let's verify that it built.
15 owner@darkstar$> docker image ls | grep -i docker_builder
16 docker_builder 0.0.0 8dc0244d19fa About an hour ago 862MB
17 docker_builder 0.0.1 1c407d6c0b93 2 hours ago 860MB
18
19 # Excellent: we still have our original "0.0.0" image we built via "bare
20 # metal building", and the new "0.0.1" image. From this point forward, we can
21 # produce new releases by modifying our "Dockerfile.builder" as needed, and
22 # then just incrementing the versions in "iax.sh" and "Makefile.builder".
Bravo! We have just bootstrapped a builder image that can create new
releases/versions of itself going forward. If anyone else wants to contribute
to this builder image, the only requirement is that they have Docker on their
local/developer machine, rather than requiring extra tools on their machine
(in the case of the initial “bare metal build” steps). Now, to build the actual
“business app” we’ll deploy into our KIND cluster). First, the
Dockerfile, dockerignore file, and Makefile, along with a slightly
modified version of iax.sh that uses the latest builder image release,
0.0.1 (normally I’d just bump the tag version in iax.sh, but I’m
deliberately maintaining different copies of the files so they can be compared
manually, and provided verbatim at a later time as examples for the reader).
1 FROM ubuntu:focal as baseline
2
3 # System packages.
4 RUN apt update -y && \
5 apt install -y \
6 python3 \
7 python3-pip \
8 && \
9 apt clean -y
10
11 # Main app.
12 ADD entrypoint.sh /
13
14 ENTRYPOINT ["/entrypoint.sh"]
1 # Ignore everything by default. We can manually add individual files as we
2 # need them to this permit-list.
3 *
4
5 !entrypoint.sh
1 #------------------------------------------------------------------------------#
2 # Defaults and global settings.
3 .DEFAULT_GOAL: all
4 APP_TAG = docker_app:0.0.0
5
6 # Version of KIND container to use.
7 KIND_IMAGE = kindest/node:v1.21.1@sha256:69860bda5563ac81e3c0057d654b5253219618a22ec3a346306239bba8cfa1a6
8
9 # Path to KIND config file.
10 KIND_CONFIG = config.yaml
11
12 # How long we'll wait for the cluster to be ready before aborting (seconds).
13 KIND_TIMEOUT = 60s
14
15 # Name of our cluster. Make this pseudo-random, or it's possible to (if we run
16 # multiple instances of this script concurrently) have two clusters with the
17 # same name, resulting in name collisions, both clusters breaking, and a lot of
18 # manual cleanup (and possibly restarting the Docker daemon).
19 # MUST match regex: `^[a-z0-9.-]+$`
20 CLUSTER_NAME := docker-app-$(shell uuidgen -r)
21 #------------------------------------------------------------------------------#
22
23 #------------------------------------------------------------------------------#
24 # Goals/recipes.
25 #------------------------------------------------------------------------------#
26 # Default goal.
27 .PHONY: all
28 all: test_app_in_cluster
29 @echo "Done build."
30
31 # Build Docker image.
32 .PHONY: docker_app
33 docker_app: docker-app.tar
34 docker-app.tar: Dockerfile.app Dockerfile.app.dockerignore
35 # Build.
36 DOCKER_BUILDKIT=1 docker build \
37 -t "$(APP_TAG)" \
38 --target baseline \
39 -f Dockerfile.app\
40 .
41 # Save to tarball.
42 docker save "$(APP_TAG)" > $(@)
43
44 # Spin-up a KIND cluster and test our "business app" in it.
45 .PHONY: test_app_in_cluster
46 test_app_in_cluster: docker_app
47 @echo "Creating test cluster: $(CLUSTER_NAME)"
48 @echo "Using Kindest image: $(KIND_IMAGE)"
49
50 # Purge stale kube config.
51 rm -rf "/work/.kube"
52
53 # Setup kubectl.
54 export KUBE_EDITOR="vim"
55 export KUBECONFIG="/work/.kube/config"
56
57 # Pull kindest image (kind binary will already pull it, but may as well
58 # be deliberate, in case we want to swap this out down the road with our
59 # own private/cached/hardened copy).
60 docker pull "$(KIND_IMAGE)"
61
62 # Spin-up the cluster (rootless;
63 # see https://kind.sigs.k8s.io/docs/user/rootless/).
64 #export DOCKER_HOST=/var/run/docker.sock
65 kind create cluster \
66 --name "$(CLUSTER_NAME)" \
67 --image="$(KIND_IMAGE)" \
68 --config="$(KIND_CONFIG)" \
69 --wait="$(KIND_TIMEOUT)"
70
71 # Command to manually purge all clusters. Maybe we shoudl run this
72 # inside a shell script so we can use an exit TRAP to guarantee we
73 # clean-up when done (rather than bail out of the build script early on
74 # the first failure and leave the system in an unknown state).
75 # (IFS=$'\n'; for i in $(kind get clusters); do echo $i; kind delete clusters $i; done)
76
77 # Show clusters.
78 kind get clusters
79
80 # Get cluster info.
81 kubectl cluster-info --context kind-$(CLUSTER_NAME)
82
83 # Install an ingress controller (so we can curl/test our app).
84 # TODO: cache a copy of the chart tarball and the container so we can
85 # make this run offline and avoid extra bandwith consumption every time
86 # we would run this.
87 kubectl apply -f https://raw.githubusercontent.com/kubernetes/ingress-nginx/master/deploy/static/provider/kind/deploy.yaml
88 # Temporary hack: delete validation webhook until issue is resolved.
89 # https://github.com/kubernetes/ingress-nginx/issues/5401
90 kubectl delete -A ValidatingWebhookConfiguration ingress-nginx-admission
91
92 # Load Docker images for business app(s) into cluster.
93 kind load \
94 image-archive docker-app.tar \
95 --name "$(CLUSTER_NAME)"
96
97 # Install Helm chart.
98 helm install docker-app charts/docker-app
99
100 # Wait for app(s) to be ready.
101 # Arbitrary sleep (1 min), just so our app chart finishes deploying.
102 sleep 60
103
104 # Execute some basic tests via curl, kubectl, etc.
105 kubectl get pods -A
106
107 # Confirm we can "reach" our pod via the cluster's IP address, then the
108 # ingress controller, then the service object, then the pod object, and
109 # finally the application running in our container in our pod (phew,
110 # lengthy).
111 # 80 is the port our ingress controller is listening on, "/" maps to our
112 # docker-app's ingress rule (should make it something more specific like
113 # "/docker-app" in production), and we need to manually specify the host
114 # name in the HTTP header (ingress-nginx doesn't allow wildcarding
115 # hostnames at this timel please see
116 # https://github.com/kubernetes/kubernetes/issues/41881).
117 # Lastly "chart-example.local" is the hostname for the ingress rule
118 # which we define in our chart's "values.yaml" file.
119 curl --header "Host: chart-example.local" 127.0.0.1:80
120
121 # Done: clean up.
122 kind delete cluster \
123 --name "$(CLUSTER_NAME)"
124
125 # Launch Docker container.
126 .PHONY: run_app
127 run_app:
128 docker run \
129 --rm -it \
130 $(APP_TAG)
1 #!/bin/bash
2 ################################################################################
3 # @brief: Docker-bootstrap script for building projects via a Docker
4 # image.
5 # @author: Matthew Giassa.
6 # @e-mail: matthew@giassa.net
7 # @copyright: Matthew Giassa (IAXES) 2017.
8 ################################################################################
9
10 # Docker runtime image to use for building artifacts.
11 DOCKER_IMG="docker_builder:0.0.1"
12
13 # Need to dynamically create a set of "--group-add" statements while iteration
14 # across all groups for which we are a member, otherwise a simple
15 # "--user=$(id -u):$(id -g)" argument to "docker run" will only capture our
16 # primary group ID, and overlook our secondary group IDs (which means we won't
17 # be a member of the "docker" group when executing nested containers as a
18 # rootless user, causing headaches).
19 MY_GROUPS=("$(groups)")
20 MY_GROUPS_STR=""
21 for grp in ${MY_GROUPS[@]}; do
22 if [[ "${grp}" == "$(whoami)" ]]; then
23 continue
24 else
25 # Need to use GID, not group name.
26 gid="$(echo $(getent group ${grp}) | awk -F ':' '{print $3}')"
27 MY_GROUPS_STR+="--group-add ${gid} "
28 fi
29 done
30
31 # Debug logging.
32 # echo "My groups: ${MY_GROUPS[@]}" >&2
33 # echo "Group string: ${MY_GROUPS_STR}" >&2
34
35 # Launch docker container.
36 # * Setup PWD on host to mount to "/work" in the guest/container.
37 # * Forward access to SSH agent and host credentials (so container uses same
38 # user/group permissions as current user that launches the script).
39 # * Make DIND possible (i.e. expose host Docker Unix domain socket to
40 # guest/container).
41 # * Make the home directory be "/work" so that it's always writeable (allows us
42 # to better handle rootless DIND and KIND).
43 # * Use host networking (non-ideal, but necessary for top-level containers to
44 # access certain services like KIND-exposed kubeadm ports redirecting to port
45 # 6443 inside a pod without requiring a bridge being setup in advance).
46 docker run \
47 --rm -it \
48 --user="$(id -u):$(id -g)" \
49 ${MY_GROUPS_STR} \
50 --volume="/etc/passwd:/etc/passwd:ro" \
51 --volume="/etc/group:/etc/group:ro" \
52 --volume="$(readlink -f .):/work:rw" \
53 --workdir="/work" \
54 --volume="$(readlink -f ~/.ssh):$(readlink -f ~/.ssh):ro" \
55 --volume="$(dirname ${SSH_AUTH_SOCK}):$(dirname ${SSH_AUTH_SOCK})" \
56 -e SSH_AUTH_SOCK=${SSH_AUTH_SOCK} \
57 --volume="/var/run/docker.sock:/var/run/docker.sock:rw" \
58 -e HOME="/work" \
59 --network=host \
60 ${DOCKER_IMG} \
61 ${@}
1 --- /work/examples/build_patterns/kind/iax.sh
2 +++ /work/examples/build_patterns/kind/iax_0.0.1.sh
3 @@ -8,7 +8,7 @@
4 ################################################################################
5
6 # Docker runtime image to use for building artifacts.
7 -DOCKER_IMG="docker_builder:0.0.0"
8 +DOCKER_IMG="docker_builder:0.0.1"
9
10 # Need to dynamically create a set of "--group-add" statements while iteration
11 # across all groups for which we are a member, otherwise a simple
We’ll also include the various additional configuration files and pieces of
Helm chart used to allow us to install our “business app” container to a
cluster (I just created it via helm create docker-app inside the builder
container invoked by iax_0.0.1.sh). Rather than include all the (many)
files verbatim, we’ll settle with knowing that the skeleton chart was created
with helm v3.6.3, and we’ll include the (slightly) modified values.yaml
file here for reference/completeness.
Note
Helm is a large topic all on its own, so tutorials regarding its use will
not be covered in this book. Readers interested in learning more about this
topic (highly recommended, by the way), are encouraged to learn more about
it [28]. For now, just think of Helm charts as a means of
packaging K8S applications for later deployment/installation to a
cluster, similar to using rpm files on Fedora and RedHat based distros,
deb files on Ubuntu and Debian distros, dmg files on Mac OS,
or setup.exe binaries on Windows-based systems. In general, I tend to
just create a skeleton chart via helm create some-chart-name and
continue working from there. For more details on the config.yaml file,
please see [29] [30].
1 # Minimal config file/YAML required by KIND.
2 kind: Cluster
3 apiVersion: kind.x-k8s.io/v1alpha4
4
5 # So we can get a working ingress controller in KIND.
6 nodes:
7 - role: control-plane
8 kubeadmConfigPatches:
9 - |
10 kind: InitConfiguration
11 nodeRegistration:
12 kubeletExtraArgs:
13 node-labels: "ingress-ready=true"
14 # Changing the host ports may break "helm install" operations unless we make
15 # additional changes to our overall configuration of KIND.
16 extraPortMappings:
17 - containerPort: 80
18 hostPort: 80
19 protocol: TCP
20 - containerPort: 443
21 hostPort: 443
22 protocol: TCP
1 # Default values for docker-app.
2 # This is a YAML-formatted file.
3 # Declare variables to be passed into your templates.
4
5 replicaCount: 1
6
7 image:
8 repository: docker_app
9 pullPolicy: IfNotPresent
10 # Overrides the image tag whose default is the chart appVersion.
11 tag: "0.0.0"
12
13 imagePullSecrets: []
14 nameOverride: ""
15 fullnameOverride: ""
16
17 serviceAccount:
18 # Specifies whether a service account should be created
19 create: true
20 # Annotations to add to the service account
21 annotations: {}
22 # The name of the service account to use.
23 # If not set and create is true, a name is generated using the fullname template
24 name: ""
25
26 podAnnotations: {}
27
28 podSecurityContext: {}
29 # fsGroup: 2000
30
31 securityContext: {}
32 # capabilities:
33 # drop:
34 # - ALL
35 # readOnlyRootFilesystem: true
36 # runAsNonRoot: true
37 # runAsUser: 1000
38
39 service:
40 type: ClusterIP
41 port: 80
42
43 ingress:
44 enabled: true
45 className: ""
46 annotations:
47 kubernetes.io/ingress.class: nginx
48 kubernetes.io/tls-acme: "true"
49 hosts:
50 - host: chart-example.local
51 paths:
52 - path: /
53 pathType: ImplementationSpecific
54 tls: []
55 # - secretName: chart-example-tls
56 # hosts:
57 # - chart-example.local
58
59 resources: {}
60 # We usually recommend not to specify default resources and to leave this as a conscious
61 # choice for the user. This also increases chances charts run on environments with little
62 # resources, such as Minikube. If you do want to specify resources, uncomment the following
63 # lines, adjust them as necessary, and remove the curly braces after 'resources:'.
64 # limits:
65 # cpu: 100m
66 # memory: 128Mi
67 # requests:
68 # cpu: 100m
69 # memory: 128Mi
70
71 autoscaling:
72 enabled: false
73 minReplicas: 1
74 maxReplicas: 100
75 targetCPUUtilizationPercentage: 80
76 # targetMemoryUtilizationPercentage: 80
77
78 nodeSelector: {}
79
80 tolerations: []
81
82 affinity: {}
For reference, the directory listing should look like the following:
kind/
charts/docker-app/
charts/
templates/
tests/
test-connection.yaml
_helpers.tpl
deployment.yaml
hpa.yaml
ingress.yaml
NOTES.txt
service.yaml
serviceaccount.yaml
.helmignore
Chart.yaml
values.yaml
config.yaml
Dockerfile.app
Dockerfile.app.dockerignore
Dockerfile.bootstrap_builder.pre
Dockerfile.bootstrap_builder.pre.dockerignore
Dockerfile.builder
Dockerfile.builder.dockerignore
entrypoint.sh
iax.sh
iax_0.0.1.sh
Makefile.app
Makefile.bootstrap_builder.pre
Makefile.builder
Now, to use our latest-and-greatest builder image to build our “app”, create a Docker image that encapsulates our app, generate a helm chart tarball that makes our containerized app “K8S ready”, and finally deploy it to KIND cluster to make sure it installs and runs as expected in a cluster. Lots of verbose logging information is about to fly by.
1 owner@darkstar:~$ ./iax_0.0.1.sh make -f Makefile.app
2 ...
3 ...
4 ...
5 ... curl --header "Host: chart-example.local" 127.0.0.1:80/
6 <!DOCTYPE HTML PUBLIC "-//W3C//DTD HTML 4.01//EN" "http://www.w3.org/TR/html4/strict.dtd">
7 <html>
8 <head>
9 <meta http-equiv="Content-Type" content="text/html; charset=utf-8">
10 <title>Directory listing for /</title>
11 </head>
12 <body>
13 <h1>Directory listing for /</h1>
14 <hr>
15 <ul>
16 <li><a href="bin/">bin@</a></li>
17 <li><a href="boot/">boot/</a></li>
18 <li><a href="dev/">dev/</a></li>
19 <li><a href="entrypoint.sh">entrypoint.sh</a></li>
20 <li><a href="etc/">etc/</a></li>
21 <li><a href="home/">home/</a></li>
22 <li><a href="lib/">lib@</a></li>
23 <li><a href="lib32/">lib32@</a></li>
24 <li><a href="lib64/">lib64@</a></li>
25 <li><a href="libx32/">libx32@</a></li>
26 <li><a href="media/">media/</a></li>
27 <li><a href="mnt/">mnt/</a></li>
28 <li><a href="opt/">opt/</a></li>
29 <li><a href="proc/">proc/</a></li>
30 <li><a href="root/">root/</a></li>
31 <li><a href="run/">run/</a></li>
32 <li><a href="sbin/">sbin@</a></li>
33 <li><a href="srv/">srv/</a></li>
34 <li><a href="sys/">sys/</a></li>
35 <li><a href="tmp/">tmp/</a></li>
36 <li><a href="usr/">usr/</a></li>
37 <li><a href="var/">var/</a></li>
38 </ul>
39 <hr>
40 </body>
41 </html>
Success: we can bootstrap our own Docker builder image, use it to create
containerized applications, wrap them in a Docker container, deploy them to a
K8S (throwaway/ephemeral) cluster, test them, all with a single
invocation of ./iax_0.0.1.sh make -f Makefile.app. More importantly, the
entire process, from building to running to deploying and testing, is
completely containerized, so we can easily reproduce it in a CI/CD
pipeline: fantastic!
Note
Build pattern viability metrics.
Repeatable: very repeatable, but sometimes errors can result in a large number of stale pods surviving the termination of the top-level tool (KIND) itself, which either requires manual intervention or carefully crafted launcher/cleanup scripts to ensure all resources are completely purged between runs. Also have to take care that all projects use psuedo-random pod names so there aren’t namespace collisions across jobs running concurrently on the same piece of build infrastructure. In short, needs to be designed with multi-tenant capabilities in mind when deploying as part of shared infrastructure such as a CI/CD system.
Reliable: very reliable (when properly configured/designed, as per the notes above). May take a few rounds of integration attempts to “get it right”.
Scalable: very scalable.
Best Practises & Security Concerns
We will conclude this chapter with a somewhat lengthy, but by no means exhaustive, collection of “best practises” one is advised to employ in the development of cloud native build patterns (as well as building applications with Docker in general). I have made every effort to keep this collection limited to “generally accepted as true” recommendations, and left out topics that may be construed as opinionated in nature.
It is worth mentioning that there are almost always exceptions to rules, best-practises, etc.; (earlier notes in the chapter mention the trade-offs of security versus functionality in using “Docker-in-Docker” via sharing the Docker socket). I would encourage readers to treat the following best-practises I describe as “very strong suggestions” as opposed to technical dogma. That being said, the authors cited below may have differing opinions on these topics, and I make no claim that my opinions necessarily reflect or otherwise align with theirs.
With this being said, collections of material (similar to what is presented in this section) may also be found in [31] [20] [21] [22] [23], to name a few examples.
Privileged Containers & Rootless Containers
An often conflated topic is the concept of a root-enabled Docker container versus a privileged Docker container. Let’s explore this in greater detail.
A root-enabled Docker container is simply a container that is invoked with the
UID (and associated permissions/access/etc.) of the root user (i.e.
UID is zero). For example, if I were to launch a container via
sudo, we’ll see that the container is running as the root user.
1 owner@darkstar$> sudo docker run --rm -it ubuntu:focal
2 root@059d5d126fac:/# whoami
3 root
4
5 root@059d5d126fac:/# id -u
6 0
OK. Well, what if I launch a container without the use of the sudo command?
After all, I added my own account to the docker group earlier in this
chapter (i.e. via sudo usermod -a -G docker $(whoami)). Let’s try this
again.
1 owner@darkstar$> docker run --rm -it ubuntu:focal
2 root@d17ad08b754e:/# whoami
3 root
4
5 root@d17ad08b754e:/# id -u
6 0
Still root. Even though our own user account is a non-root account, Docker (and
the processes/containers it launches) are launched via the root user account
(adding our account to the docker group merely grants us access to use
Docker: it doesn’t affect runtime permissions/access; [32]). To
actually launch the container as a non-root user (less important on local
development environments if the container comes from a trusted source, but very
important if the container is being used in a production environment,
especially if it’s part of a user-facing or public deployment), one may either
make use of the --user argument to docker run [33], or by
use of the USER keyword in the Dockerfile used to build the
Docker image (that is later used to invoke a container).
Now, the other topic of interest: privileged containers. Privileged containers
are simply containers that have been invoked via docker run (or a similar
API call) with the --privileged flag set. This flag grants the
container access to all devices on the host OS, and makes it trivial to
break out of the container (even more trivial than running a container as
root). It should only be used for very specific cases where the container needs
access to specific file systems or hardware, and all users of the system
acknowledge in advance that the container is not at all secured, having full
read/write access to the host system.
Now, with that out of the way: don’t use either of these methods (root-enabled containers or privileged container) unless there is a very good reason for doing so, and all stakeholders are well aware of the potential consequences of using containers with these features enabled.
Using dockerignore for Security and Image Size Reduction
Earlier in this chapter, the reader may recall mention of the use of the
DOCKER_BUILDKIT environment variable when executing docker build
operations, along with the recommendation of the use of .dockerignore
files (Single Container with Docker). It’s an important-enough topic to merit a
second mention, as it can help reduce the size of the final Docker image built,
as well as preventing cases where privileged information (i.e. SSH
keys, signing certificates, user credentials, etc.) could accidentally be
bundled into the image as well (a terrible practise in general, and
catastrophic if the image is published and made accessible to a broad audience;
even more so if publicly released). Rather than reproduce a lengthy tutorial on
the topic here, the reader is encouraged to review [13]
[14] [15] [16].
Reducing Image Size and Number of Layers with apt
The reader may have noticed a common pattern in Dockerfiles throughout this chapter (example below).
1 FROM ubuntu:focal as baseline
2
3 # System packages.
4 RUN apt update -y && \
5 apt install -y \
6 make \
7 gcc \
8 && \
9 apt clean -y
Why cram so many commands (separated with the && functionality our shell
provides) into a single Dockerfile RUN statement? Why not do something more
“clean” like so:
1 FROM ubuntu:focal as baseline
2
3 # System packages.
4 RUN apt update -y
5 RUN apt install -y make
6 RUN apt install -y gcc
7 RUN apt clean -y
Well, there are a few reasons for this. For starters, each RUN statement
effectively results in an additional layer being created in our overall Docker
image [34]: something we generally try to minimize wherever
possible. Additionally, Dockerfiles will often have (especially in the case of
“builder” images used for compiling/building projects, like we’re covering in
this chapter) several dozen packages (possibly hundreds, depending on how many
additional dependencies apt pulls in). Therefore, the general practise is
to have all the apt-supplied packages stuffed into a single layer, rather
than attempting to have more granular control over it. Also, if we’re
installing numerous packages that have common/shared dependencies, a granular
approach would be inconsistent at best when trying to force specific
dependencies into a specific layer. So, at a minimum, our “optimal” Dockerfile
should at least look a bit like so:
1 FROM ubuntu:focal as baseline
2
3 # System packages.
4 RUN apt update -y
5 RUN apt install -y make \
6 gcc
7 RUN apt clean -y
We could always put make and gcc on the same line, but, at least in my
own opinion, it’s a lot more readable this way (especially when dozens of
packages are listed). So, what about the apt update and apt clean
steps? Why also cram those in to the same RUN statement as the apt
install step? As mentioned earlier, every RUN statement will result in a
new layer. Furthermore, if we add a file to our image in one stage of our
Dockerfile, and remove the same file in a later stage, the file is still in
our overall Docker image! This means that the image size is still adversely
impacted by this file, but the file isn’t (easily) accessibly. This also has
security implications that are covered in the subsequent sub-section.
In the case of installing packages via apt install, by condensing these
various commands into a single RUN statement, we’re able to effectively get
a list of the latest packages available, install them, and clean up the apt
cache (and copy of the package listing) in a single step, avoiding a plethora
of intermediate (and completely unneeded) files from being bundled into our
overall image. Hence, we arrive at our original example again:
1 FROM ubuntu:focal as baseline
2
3 # System packages.
4 RUN apt update -y && \
5 apt install -y \
6 make \
7 gcc \
8 && \
9 apt clean -y
Current, official versions of apt automatically execute the equivalent of
apt clean (i.e. cache isn’t preserved after installation completes), so the
apt clean step is less relevant on something current like Ubuntu 20.04
“Focal”. However, for completeness, we’ll present a couple of example
Dockerfiles and demonstrate that there is indeed a difference in overall image
size and the number of layers due to whether-or-not condensed RUN
statements are used.
1 FROM ubuntu:trusty as baseline
2 # System packages.
3 RUN apt-get update -y
4 RUN apt-get install -y make
5 RUN apt-get install -y gcc
6 RUN apt-get clean -y
 1 owner@darkstar$> docker build . -t my_docker_builder:local
 2 Sending build context to Docker daemon  35.33kB
 3 Step 1/5 : FROM ubuntu:trusty as baseline
 4  ---> 13b66b487594
 5 Step 2/5 : RUN apt-get update -y
 6  ---> Using cache
 7  ---> e4173983516e
 8 Step 3/5 : RUN apt-get install -y make
 9  ---> Using cache
10  ---> 1ec3953ddcc5
11 Step 4/5 : RUN apt-get install -y gcc
12  ---> Using cache
13  ---> dc9f68dcdfd4
14 Step 5/5 : RUN apt-get clean -y
15  ---> Using cache
16  ---> 9fc945253a98
17 Successfully built 9fc945253a98
18 Successfully tagged my_docker_builder:local
19
20 owner@darkstar$> docker image ls | grep my_docker_builder.*local
21 my_docker_builder                 local     9fc945253a98   7 minutes ago    285MB
22
23 owner@darkstar$> echo "Number of layers: $(( $(docker history --no-trunc my_docker_builder:local | wc -l) - 1 ))"
24 Number of layers: 9
Now let’s repeat this experiment with “squashing” (i.e. condensing of commands
passed to a RUN statement).
1 FROM ubuntu:trusty as baseline
2 RUN apt update -y && \
3     apt install -y \
4         make \
5         gcc \
6     && \
7     apt clean -y
 1 owner@darkstar$> docker build . -t my_docker_builder:local
 2 Sending build context to Docker daemon  35.33kB
 3 Step 1/2 : FROM ubuntu:trusty as baseline
 4 ---> 13b66b487594
 5 Step 2/2 : RUN apt-get update -y &&     apt-get install -y         make
 6 gcc     &&     apt-get clean -y
 7 ---> Using cache
 8 ---> 655083adb0ef
 9 Successfully built 655083adb0ef
10 Successfully tagged my_docker_builder:local
11
12 owner@darkstar$> docker image ls | grep my_docker_builder.*local
13 my_docker_builder                 local     655083adb0ef   9 minutes ago 282MB
14
15 PWD: ~/code/repos/iaxes/pronk8s-src/examples/build_patterns/dind_example
16 [09:44:37]: owner@darkstar$> echo "Number of layers: $(( $(docker history --no-trunc my_docker_builder:local | wc -l) - 1 ))"
17 Number of layers: 6
So, we’re able to reduce the image size and number of layers, and this will also play an important part in the following sub-section on credential leaks.
Credential Leaks - Don’t Embed Credentials
Follow hot on the heels of the previous sub-section, we cover another reason to
make use of dockerignore files and be cautious about what files get pulled
in during docker build operations: credential leaks. This happens when
privileged information (i.e. signing certificates, SSH keys,
usernames/passwords, API keys, etc.; are accidentally made public or
available to unauthorized parties). Sometimes this can be due to a plain text
file containing credentials being created during automated CI/CD
builds. Masked environment variables are preferable, as covered in
Continous Integration & Continuous Delivery, as it avoids having to rely on things like dockerignore
files being the last (or only) line of defense against bundling credentials
into images, or having to zero-fill persistent storage devices out of concern
mission-critical credentials are scattered, unencrypted on disk drives
throughout your build infrastructure.
In any case, we’ll cover a simple example where credentials are deliberately “baked in” to a Docker image, with the intent (by the hapless user) of only having them available “temporarily”, due to them being needed for some intermediate build operation to run successfully.
 1 FROM ubuntu:focal as baseline
 2
 3 # Add our super secret file. Some intermediate part of the build needs to know
 4 # this information to complete.
 5 ADD super_secret.txt /
 6
 7 # System packages.
 8 RUN apt update -y && \
 9     apt install -y \
10         cowsay \
11     && \
12     apt clean -y
13
14 # Remove our secret so we're all safe and no secrets get leaked. Right?
15 RUN rm /super_secret.txt
1 One, if by land, and two, if by sea.
Now, let’s build this image, and see how “secure” it really is.
 1 # Build our image.
 2 owner@darkstar$> docker build . -t silly_secrets:local
 3 Sending build context to Docker daemon  3.072kB
 4 Step 1/4 : FROM ubuntu:focal as baseline
 5  ---> 1318b700e415
 6 Step 2/4 : ADD super_secret.txt /
 7  ---> 0df172df41b1
 8 Step 3/4 : RUN apt update -y &&     apt install -y         cowsay     &&     apt clean -y
 9  ---> Running in 4b8d868e2866
10 ...
11 ...
12 Step 4/4 : RUN rm /super_secret.txt
13  ---> Running in 9814d6c45b09
14 Removing intermediate container 9814d6c45b09
15  ---> 092e3a86d509
16 Successfully built 092e3a86d509
17 Successfully tagged silly_secrets:local
18
19 # Image built. Let's run it and see if our secret file is visible.
20 owner@darkstar$> docker run --rm -it silly_secrets:local ls -a /
21 .   .dockerenv  boot  etc   lib    lib64   media  opt   root  sbin  sys  usr
22 ..  bin         dev   home  lib32  libx32  mnt    proc  run   srv   tmp  var
23
24 # Hmm, looks like our file isn't in the final image. Let's dive deeper and
25 # inspect the individual layers.
26 owner@darkstar$> docker history --no-trunc silly_secrets:local
27 IMAGE                                                                     CREATED              CREATED BY                                                                                          SIZE      COMMENT
28 sha256:092e3a86d50915fb48b4278716574b46cc2514bae8eaa48d6a2051cf59fd1a9b   About a minute ago   /bin/sh -c rm /super_secret.txt                                                                     0B
29 sha256:db6b071129a483ca39a6b8e367ea7a2af63ff057acfcdc5a70e5bad8c00be768   About a minute ago   /bin/sh -c apt update -y &&     apt install -y         cowsay     &&     apt clean -y               75.6MB
30 sha256:0df172df41b168cd1ec523591c0b2e603210ced2f85a427247b093e87c377be8   About a minute ago   /bin/sh -c #(nop) ADD file:8401e4e245be4f0e09057e36a6ef99968758e9152fb5acbcb66fcadf5f2cc224 in /    38B
31 sha256:1318b700e415001198d1bf66d260b07f67ca8a552b61b0da02b3832c778f221b   12 days ago          /bin/sh -c #(nop)  CMD ["bash"]                                                                     0B
32 <missing>                                                                 12 days ago          /bin/sh -c #(nop) ADD file:524e8d93ad65f08a0cb0d144268350186e36f508006b05b8faf2e1289499b59f in /    72.8MB
33
34 # Well: that looks interesting: some stage of the build is deleting a
35 # "secret" file? Let's try running the intermediate container (i.e. just
36 # before the deletion step).
37 owner@darkstar$> docker run --rm -it db6b071129a483ca39a6b8e367ea7a2af63ff057acfcdc5a70e5bad8c00be768 ls -a /
38 .           bin   etc   lib32   media  proc  sbin              sys  var
39 ..          boot  home  lib64   mnt    root  srv               tmp
40 .dockerenv  dev   lib   libx32  opt    run   super_secret.txt  usr
41
42 # This bodes poorly for the developer.
43 owner@darkstar$> docker run --rm -it db6b071129a483ca39a6b8e367ea7a2af63ff057acfcdc5a70e5bad8c00be768 cat /super_secret.txt
44 One, if by land, and two, if by sea.
45
46 # Oh dear: deleting the already-included file is just shy of useless in terms
47 # of security.
In summary, avoid having credential files anywhere near your build jobs, employ the use of masked credentials or more sophisticated techniques when supplying credentials/tokens/keys to automated build jobs, and always keep in mind that the concept of “deleting files from containers” is a misnomer.
Verify Downloaded Packages via Checksums
I’ve encountered numerous online examples (among the few times I won’t provide a citation, out of courtesy primarily) where packages (some secure, legitimate, and safe to use; some not quite so much) are provided online in the form of a tarball or pre-compiled binary, and the author encourages the end-user to simply install it via something like so:
1 wget http://this***-site-is-safe-i-promise.xyz/totally_not_a_virus.tar.gz
2 tar -zxf totally_not_a_virus.tar.gz
3 make
4 sudo make install
Yeah: don’t do this. Even if we trust the author, there’s always the chance an attacker has potentially compromised some piece of the chain of communication between where that file is hosted, and us (man-in-the-middle attack, hosting provider has been compromised, supply chain attack results in malware being embedded in the tarball, etc.). If we’re going to pull a file off the internet an embed it into our Docker image as part of an automated build, we should at least do a minimal security assessment of the payload (i.e. tarball) via checksum analysis.
 1 # URL of the file we want to download.
 2 PAYLOAD_URL="https://golang.org/dl/go1.16.7.linux-amd64.tar.gz"
 3
 4 # sha256sum (don't use older checksums like Md5) of the package, as provided
 5 # by the maintainer. We accessed these value via HTTPS with no security
 6 # warnings, we're reasonably certain the maintainer is reliable and has a
 7 # secure infrastructure, etc.
 8 PAYLOAD_SUM="7fe7a73f55ba3e2285da36f8b085e5c0159e9564ef5f63ee0ed6b818ade8ef04"
 9
10 # Pull the payload.
11 wget "${PAYLOAD_URL}"
12
13 # Validate the checksums (of type SHA256).
14 # There are better ways to templatize, prettify, automated, etc.; this step.
15 # This is just to provide a minimal, readable example.
16 DOWNLOADED_SUM="$(sha256sum go1.16.7.linux-amd64.tar.gz | cut -d ' ' -f1)"
17
18 # Compare, and proceed if the checksum we calculated matches what we
19 # expected.
20 echo "Expected checksum: ${PAYLOAD_SUM}"
21 echo "Received checksum: ${DOWNLOADED_SUM}"
22 if [[ "${PAYLOAD_SUM}" == "${DOWNLOADED_SUM}" ]]; then
23     echo "Checksums match. Proceed with build job."
24 else
25     echo "Checksum failure: aborting build job."
26     exit 1
27 fi
This is an important concept to keep in mind: even if we completely trust the maintainer and provider of an external package, there are numerous venues for an attacker to take advantage of that trust and put a “mine in the pipeline” if care is not taken for all dependencies pulled into your images (e.g. supply-chain attacks in this particular case).
One final note: don’t run these checks in a Dockerfile, run them in a
pre-build script or a Makefile first. I’ve seen a number of examples
online where such operations are executed in a Dockerfile, and it’s just
increasing the overall size of the image (and number of layers) drastically for
no reason at all. Prepare all your artifacts in advance, add them to a
permit-list in the form of a .dockerignore file, and then run your
docker build operation against your Dockerfile. The performance metric
gains alone will be their own reward.
Additional Reading
I would encourage the reader to start with [35] and [36], and from there, broaden one’s research independently. The materials referenced in the aforementioned citations also contain a plethora of relevant security knowledge, and also merit the attention of the reader. From that point, I leave it to the reader to begin their own foray into security research on the topics of Docker, containers, and cloud native development.
Additionally, I encourage readers to visit the Reproducible Builds community [37], as there is considerable overlap (in my own opinion) between the material presented in this chapter, and the methods and goals presented by the aforementioned.
Lastly, I encourage those engaged in researching and learning about cloud native security to consider reaching out to the members of the CNCF Security Technical Advisory Group, “TAG Security” [38] via their Slack channel. (disclaimer: I volunteer with this group). I have found it to be a courteous and knowledgable community, and when initially joining the team’s Slack channel years back, I was able to get help from community members in “knowing where to look” for answers to security-related technical questions.